By Greg Smith S/V Susurro
Over a year ago, I dropped a note to the board regarding the untimely failure of the Farymann S30M in our 38 Downeast, “Susurro”. At that time, I promised a story, and now that the boat is back in the water, I’ve run out of excuses. Sooo………….! Here Goes.
We were motoring down the ICW, South of Savannah GA, returning home from a delightful spring break stay in Beaufort SC when at about mile 611, a cacophony erupted from the engine room that could only mean that we were about to become a purists sailboat. I was able to get the engine down to idle speed and the gearbox in neutral when the engine abrubtly siezed. The resulting sudden silence erased all doubt. With a light breeze blowing and Kilkenny Creek marina just a few miles away, the decision to put up a sail and proceed up Kilkenny Creek was an easy one. Our arrival at Kilkenny was uneventful, as we managed to dock under sail with minimal embarrassment on the second try.
Once tied up and having consumed the obligatory beer, inspection of the engine was in order. The inability to turn the crank even a little and a telltale drool of salt water out one of the air intakes did not bode well for a speedy repair. Kilkenny is a sleepy little rural “fish camp” that is truly located at the end of the road. This normally delightful situation becomes a liability when one is faced with repairing an old, broken, German Diesel. So now we’ve got a problem. How do we get ourselves and the boat home in time to meet the typical obligations of the chronically employed without breaking our over utilized bank account. Given the vagaries of the weather and the twists and turns of the ICW, sailing home did not appear to be a prudent choice. Of course, there is always $ea Tow…..$$$$. Not a prudent choice either. But, there is our “ladder from hell” on the stern and our dinghy motor. A plan begins to take shape.
Some calling on the cell phone produces a car that brings two 5 gallon gas cans and is capable of getting some of the crew back to meet their schedules. Cody, our 16 year old son and I will be left to bring the boat home. A scavenged two by four, some line, and the stern pulpit outboard motor mount convert our boarding ladder into an improvised home for the dinghy outboard. At least now we will not be totally at the mercy of the fickle winds. The next morning brings absolutely calm winds with a forcast of becoming 5 to 10 knots out of the North-Northeast. If you believe forecasts, this is a good one for our purposes. Departing Kilkenny, the outboard gives us about 3 1/2 knots at an economy power setting. Things are lookin good. After about 3 hours, the forecast winds begin to appear. Up go the sails. Soon the boat is heeling enough to lift the outboard from the water, so we shut it down.
Things are looking even better. It looks like we will easily make the anchorage at New Teakettle creek by cocktail hour. Our cocky attitude is soon quenched. At mile 645, Neptune has his way and brings the wind around from the Southeast. We now face a 2 mile long, narrow, dredged channel directly into the wind and a knot or so of opposing current. And…. the outboard refuses to start! But, we’re sailors! Right? For 3 hours we repeat the grueling sequence of 1-depth alarm sounds, 2-tack, 3- Cody runs genoa up around the inner forestay, 4- I grind winch, 5-Cody relieves me on winch, 6- boat gets up to speed for 1 minute, 7- go back to step 1. Persistence finally pays off, and we get to sail downwind into New Teakettle creek to anchor for the night just as the sun sets. We are greeted by rounds of applause from several boats in the anchorage – it seems they have been watching our progress across the marsh all this time! Dinner and the sounds of “Prarie Home Companion” on the radio soon lull us into a sound sleep.
The next morning dawns with one of those sunrises that God provides to cure atheists and reward the rest of us. The weather forecast predicts winds developing out of the South, however, so getting the outboard running is a must. The outboard, properly rested, starts right up!
The gnats and mosquitoes have by now homed in on us, so it is time to get going. We motor uneventfully for a couple of hours when a steady 10 knot Northeast wind pipes up. So much for the forecast! Learning from yesterdays behavior of the outboard, I elect to leave it running and put up just the main sail. That way, if the boat heels too much for the kicker, I can easily let it out. We are soon averaging 4 to 5 knots and manage to make it back to our home port of Brunswick GA by mid afternoon.
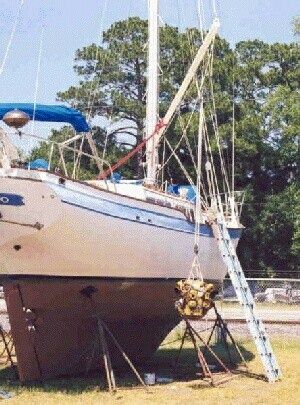
The boat is soon hauled, and the task of removing what has now become so much ballast begins. Removal of the companionway stairs, disconnection of everything and getting the engine up on deck takes about 1 day. I rigged a hoist with the boom, main halyard, outhaul, a snatch block, and the 4 to 1 blocks from the main sheet. Had I known just how heavy the Farymann engine is, I would have used a chain hoist instead of the mainsheet block. Anyway, getting the engine out was the least of my worries. I now had to wrestle with the repair / replace dilemma that has been the subject of many discussions on this site and elsewhere. The first task is to get the engine apart to see just what is wrong with it. Actually, I’m getting ahead of myself. The first task was to clean out the garage so I would have a place to work on the beast. An engine stand is constructed from two by fours and what turns into a year long project is about to get underway.
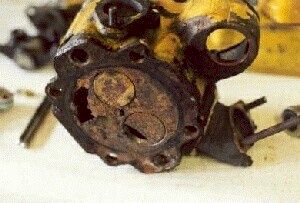
The left hand picture is of the #1 cylinder head. The gaping hole in the head and the broken exhaust valve speak for themselves. My best guess as to the mode of failure is either salt water finally ate through the head, causing the valve to break, or the valve broke and then punched a hole in the head. The picture on the right is of the corresponding cylinder. “Beat Up” is a polite way of describing the top of the piston. The engine had been getting hard to start recently – a behavior I attributed to worn rings. Maybe there was more wrong than I thought. A thorough inspection of the rest of the engine revealed no other damage. The crankcase was clean with no accumulation of sludge. There was no visible wear to the cam lobes, and the crankshaft rod journal mic’d out standard. It appeared that the engine would probably be a good candidate for a “top” overhaul, leaving the lower end intact. I prepared a parts list and sent it to PRP Farymann for a quote. After 3 weeks and as many wasted phone calls, I called Dave Oostman at Entec out on the West coast. Dave is as easy to deal with as PRP is not! He is also a wealth of information and knows these engines inside and out. Dave came back with a quote for all the required parts except for misc. studs, nuts, washers, etc.. with a total far below the cost of a brand Y or W replacement. Since I was in the situation of having more time than money, and the boat securely sitting on dry land with hurricane season approaching, it seemed a no-brainer to repair the Farymann.
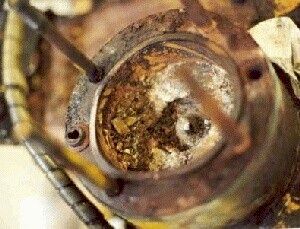
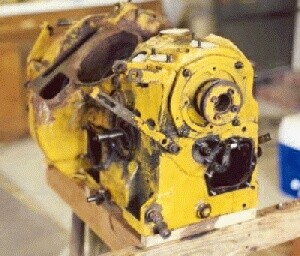
Well… off went a check to Entec and I began to clean up the parts I planned on keeping. One thing that you can pretty well assure yourself of when disassembling an old marine engine is that what should come off won’t and what shouldn’t come off will! Removing a nut from a stud will almost always result in either a broken or removed stud. The photo at the right is of the bare block with all the bits and pieces removed. Of course while this is going on, I discover a few more parts that really don’t belong back on the engine, so another check goes off to Dave. The fuel injectors get shipped off to a diesel shop in Jacksonville FL for overhaul. Each piece of metric hardware that is removed gets cataloged, as none of the old stuff is going back on the engine. With list in hand, I now search for a vendor. This was probably the most frustrating part of the whole rebuild process. The mom and pop places that deal with folks like us don’t stock the stuff and aren’t willing to do much to solve the problem. The big guys, have the stuff, but a two bit order like mine is a thorn in their side. The Farymann parts show up in about 5 weeks right on time (thank you Dave), but I have nothing to bolt the whole mess back together with. Just as I was about to lose faith in the American entrepeneurial spirit, I found J.W. Winco, Inc. up in Wisconsin. (www.jwwinco.com phone 800-472-0670) These guys were willing to supply everything I needed at a reasonable price except for the long studs that hold the bell housing on. These I had to have fabricated by a machinist friend.
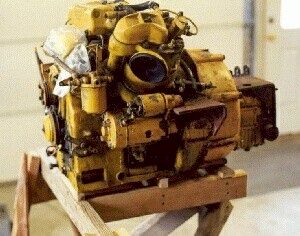
Actual reassembly of the engine was not terribly difficult. The Farymann repair manual and parts manual have lots of pictures, and these really are rather simple engines. I probably would not have attempted this if there were any damage to the bottom end, as its assembly requires some specialized tools. Once it became obvious that the engine was really going to become whole again, it was time to address its ultimate home. I pulled and inspected the prop shaft and installed a new cutless bearing and shaft log hose. The portside engine bed showed a lot of rust, as that is the side of the engine with no oil leaks. On cleanup, flakes just kept coming off until the metal was reduced to about half its original thickness. Well, at least this one would make a good pattern….. A local welding shop fabricated a replacement – They did a real good job of maintaining the critical hole spacing dimensions so everything would still fit. They also sandblasted and painted the starboard rail while they were at it.
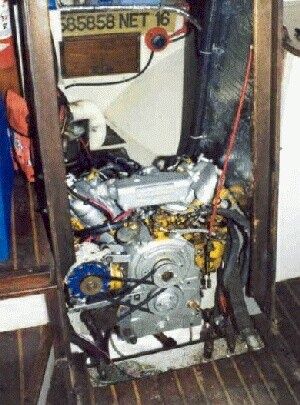
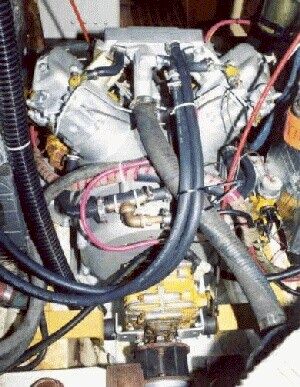
Dropping the engine in was just the reverse of getting it out (except that this time I used a chain hoist). Once the engine was in place, the shaft alignment was checked and the engine shimmed as required. I plan to recheck the alignment after the boat has been in the water a couple of months, as it wouldn’t suprise me if the hull had warped a bit after a year on the hard. A new cooling system was built from heater hose and bronze fittings to replace the Farymann rubber octopus. This was cheaper than ordering one from the factory and it can now be repaired just about anywhere in the word. Bleeding the fuel lines involved working the fuel pump hand lever until I got a steady flow of fuel to the tank return, then cranking the engine with the compression released and the injector connections finger tight. As soon as diesel started leaking out the fittings we were ready to go.
Preparation for a test run involved inspecting the engine (again), checking the oil (again), and running a hose from the raw water pump to a bucket fed from a garden hose. A brief prayer, and it was time to hit the starter button. A pleasantly short crank of a few seconds and , voila! The rejuvinated Faryman woke from its slumber. It was really kind of an anticlimax. Oil pressure – 80psi, cooling flow – OK, smoke – none, sound – normal, and leaks – few. I shut the engine down and tighten a few offending hose clamps and try again. This time she’s dry as a freshly changed baby. I go ahead and run her for about 30 minutes at varying speeds with no surprises. It is now time to shut down, clean up my considerable mess and get the boat ready to launch.
Friday morning’s appointment with the travel lift actually happens and Susurro metamorphs from an ungainly yard duck back into a boat. The shaft log isn’t leaking too badly so it’s off for the mile or so run to the slip. Once back at the slip, with the boat securely tied, I run the engine for about 1 hour with the prop engaged at varying speeds from idle to full throttle. Everything seems to be holding together, so now I give it a more extensive break in run. All the experts seem to agree that the best thing for a new engine is to work it, so my break in procedure involved several 2 hour runs around the harbor, with varying engine speeds of 1500 rpm and up. Each run included at least 30 minutes at full throttle. The reborn engine is definitely smoother and more powerful. It starts quickly, and will easily push the hull to 6 knots. After 10 hours of running, the oil is still clean and I have used less than 1 pint.
The following is a list of parts that I ended up needing to get the job done.
1 exhaust system assembly
8 cylinder stud
2 front motor mount
2 rear motor mount
2 piston with rings
1 cylinder assembly, port
1 cylinder assembly, stbd.
2 cylinder head assmbly
2 connecting rod bearing
2 connecting rod bushing
2 rocker arm bushing
1 gasket set
1 fuel line, filter to inj. pmp.
1 fuel line, injector leak off
1 fuel line, lift pump to filter
misc. metric hardware, hoses, paint, etc.
Outside shop work consisted of Fuel injector overhaul, fabrication of flywheel housing studs, and fabrication of a new portside engine bed. Total out of pocket expense was about $3600 (not counting boat haul, yard storage, and launching).
Wrapping up, would I do this again if faced with the same circumstances? Most definitely YES! I learned a lot and now am a lot more comfortable with the Farymann than I was before. This is a very simple engine, with very little to go wrong. The “bottom end” is built like the proverbial brick outhouse, and as long as cylinders and exhaust manifolds are available, the engine will probably last longer than the boat. The newer 4 bangers are smoother and quieter, but carry the burden of added cost and complexity. If I run out of things to do, I would like to convert to fresh water cooling with a heat exchanger, but that’s a project for another day…..
Cheers …………..
Greg Smith
S/V Susurro

Recent Comments