Main Cabin Windows – Original Installation – Carmine Pizariello
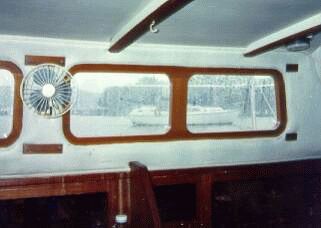
When I purchased TOPAZ, a 1975 cutter rigged Downeaster 38, the main cabin windows were 3/8 inch Plexiglas mounted to the exterior surface of the cabin sides. The Plexiglas was fastened with ½ inch long bronze #8 wood screws that just penetrated the outer fiberglass skin. The exterior finish was a teak molding that was also attached by wood screws through the outer fiberglass skin. The trim had a ½ inch rabbit to accept the Plexiglas and cover the bronze screw heads. The trim was almost two inches wide and this made the windows appear even larger than the openings in the cabin top.
The interior vinyl liner was folded outboard to cover the exposed core (since the windows were surface mounted) and held in place by upholstery staples (the same type used all over the boat) embedded in the core material. This was finished by a gold colored aluminum trim (like that used for carpet edging). The trim was screwed into the core material.
Problems with Original Installation
Leaks, leaks and more leaks. The Plexiglas was badly crazed and the teak trim was cracked and split. The windows had been re-caulked a number of times (inside and out), each time with a different product, and they still leaked.
Upon removing the windows the real problems were exposed. The core was wet and, in places, delaminated from the skins around the window openings. This finally explained leaks that I could never track down. The water was migrating through the core to several screws holding the interior trim and wicking down into and around the trim. I drilled drain holes in strategic low spots and drained the core. I got a quart of water out of one hole. Little tufts of pinkish powder on the underside of the deck were another sign that water was leaking from the core into the interior.
All the window cutouts looked like a hung-over yard worker had made them with a dull saws-all. I mean they were irregular, not! symmetrical and port and starboard pairs did not match. My guess is that the original framed windows had been used as a guide and the hole cut out freehand to remove the original frame.
My working theory is that these windows were an ill-conceived fix by a dealer from hell. Probably responding to an irate owner’s complaint about leaking windows that could not be fixed.
New Window Design
My fundamental design philosophy was that the new windows should be structural members and not just a frame to hold a sheet of Lexan and keep the water out. In my opinion, the holes in the cabin sides were far too big and compromised the ultimate strength of the cabin top. I need not mentioned my thoughts on the size of the windows and their ability to survive a lee side wave during a knockdown.
The overall project objectives, in order of priority, were therefore as follows:
1. Stop Leaks
2. Add Structural Strength (to cabin top and be able to stand up to boarding seas)
3. Repair Damage to skin and core so far as possible
4. Look Good Inside and Out
5. Be Easy to maintain
The Project
The job was performed over two winter lay-up periods. At least half the work was planning and making templates and jigs. Sometimes I had to make a template to make the template. This job involved a lot of steps and much planning. I would be happy to discuss the job in detail if anybody has specific questions.
Key Tools and Materials
Key tools and materials were roughly as follows:
1. table saw
2. router with standard and plunge base, assorted bits
3. router guide rings for using router to cut curves using templates
4. dremmel tool with assorted bits
5. bar clamps, lots of ¼’ luan, AND 3/8” plywood, sheet rock screws for making
templates and jigs
6. two gallons of West System Epoxy lots of colloidal silica
7. 25 sq. feet of 8/4 (1 ¾”) teak planking ( about $500)
8. 4X4 sheet of 3/8’ mar resistant clear polycorbonate sheet
(generic equivalent to GE MR10 Lexan sheet)
Note: I used the router and jigs to cut the mortis and tenon joints. If I had to do this again, I would have bought a router table to cut the tenens and bought a drill press with mortise bit to cut the mortises.
Window Frame and Glazing
Window frames were fabricated from 1 ¾ “ thick teak planks ripped into 2 ½’ inch strips. Each frame (4) was divided into two windows by a center mullion to add structural support and keep individual window size down. Windows were built square with mortis and tenon joints, and glued with West epoxy. The inside and outside curves were then cut using plywood templates, router and router guides. Curves, rabbits and edge rounding were expensive – all told I figure 30 to 40% of the teak was turned into sawdust.
Overall outer dimension of rear window frame was 42” X 14 ½”. Finished frames are 2’ wide including rabbit for glazing. Corner radius on inside is 1 ¾’, outside 3 ¾”. Center mullion is 3 ½” wide. Rabbit to accept Lexan glazing is ½” wide and slightly over 3/8” deep. Dimension of Lexan glazing for rectangular (6 of the 8) windows was 11 3/8’ x 18 3/8”. This allowed for 1/8” expansion all round. Two forward windows with elongated lower edge were in same proportion however size of the larger window was set so that the 6 smaller windows were all the same size.
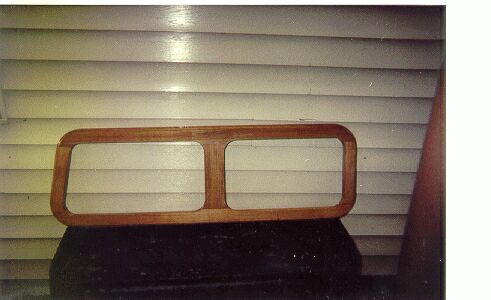
INSIDE VIEW OF FORWARD WINDOW FRAME
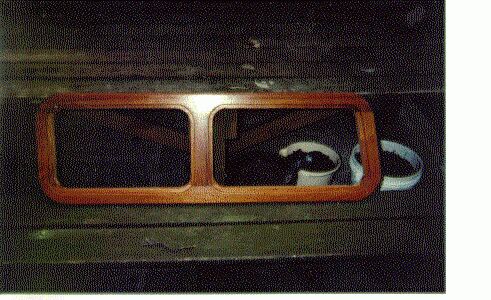
SAME FRAME, OUTSIDE VIEW WITH CETOL AND RABBIT FOR LEXAN GLAZING
The Lexan was cut with a router using a plywood template and router guides. This is remarkably tough stuff, I had to take 1/16th of an inch off at a time. Any more and I risked loosing control o the router. Each Lexan pane was set in clear silicone using #6 SS wood screws on about 4” centers.
Outer edge of frame was cut with cut with a 7/8” rabbit all round (thickness of the fiberglass cabin top). Then top and bottom edges were cut to match the curve of the cabin sides. A template of the curve in the cabin was used to cut each curve (i.e., 2 templates per frame, an upper and lower edge). The forward and aft ends of the windows kept the original 7/8” depth rabbit. Overall effect is that more frame is shown on the outside at the forward and after ends of the frame. See later photo.
Cabin Side Preparation
Old teak trim and Plexiglas was removed. The core material was then ground out to a depth of 1 ½” all round using a dremmel tool. Core was allowed to dry for a month or so if it was wet. Core and interior skins were then saturated with epoxy resin and 3/8’ mahogany strips 2” wide were placed in the void to replace the removed core material. This was all bonded together with peanut butter consistency west epoxy colloidal silica putty. Wood was surface coated with the epoxy mixture above the fiberglass skins for about ½”. The area around the window openings was VERY solid after the epoxy set up,
Since the holes in the cabin side were pretty crude, the extension of the mahogany ½” into the window opening allowed some latitude in cutting a new symmetrical and even hole in the cabin side. Plywood templates for the new window cutouts were placed over the window openings. This was done in pairs (forward and aft) so that the frames would be at the same height and roughly follow the sheer line of the cabin top. You will notice from the photos that this tended to toe the windows in at the top.
In selecting the final window placement, I tried to preserve as much of the old structure as possible; not have the window rabbit hang only on the new mahogany core; and preserve the sweep of the lines of the cabin top. Once the templates were in place, they were screwed into the sides of the cabin and the router with guides was used to cut the proper size opening for the new window frames.
Installation
Each of the frames was set into to the cabin sides using the same combination of west epoxy and colloidal silica putty. I used a combination of clamps and wood screws to bring the windows home. The screws were set from the inside, countersunk and toed into the backside of the frame at the rabbit to pull the windows flush with the cabin sides. I used cut to size 2×2 with stand off and bar clamps to pull the windows in prior to using the screws.
Prior to installation, preparation and laying out all materials was really is important. This included taping off everything inside and out to protect from epoxy, pre-drilling holes in the cabin sides and backside of the rabbits and having all materials handy. This is a two-person job, three on a hot day since the rate of cure of the epoxy sets the pace of the job.

INSTALLED FRAMES
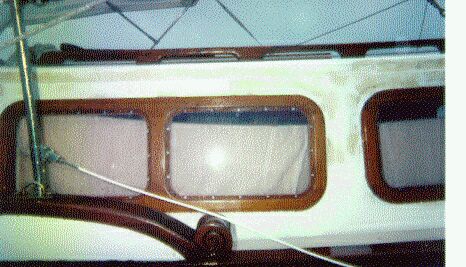
SAME FRAME, CLOSE-UP VIEW
Because I had cut the curve into the rabbit on the upper and lower edges of each frame, the windows required very little tension to bring them home since most of the curve had been taken into account. Clamping pressure was needed mostly to rack the frame since the curve between the upper and lower part of the frame was a compound one. I estimate the clamping force at less than 100 lbs. since I could bend the frames home with hand pressure alone.
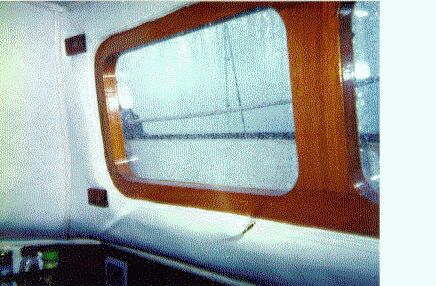
The overall effect on the inside of the boat is that the forward and aft edges of the windows are flush with the interior skin of the cabin sides. The center part of the window extends about ½” into the boat On the exterior, the forward and aft ends of the window frame rise out about an inch from the cabin side skin. The center of the frame is about 3/8’ from the cabin side skin.
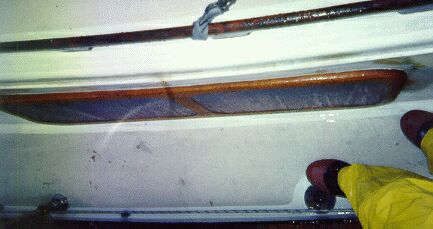
LOOKING DOWN – FRAME IS FLAT, RABBIT FITS THE CURVE OF THE CABIN SIDE
INTERIOR FINISH AND TRIM
Interior Trim
A 3/8” plywood staple strip was screwed into the fiberglass around each window. The vinyl liner was then stapled to the strip using SS staples. Vinyl piping was then used to finish and hide the staples.
Material Costs and Labor
Teak $560
Lexan $350
Epoxy, fillers, gloves $250
Wood for templates/jigs $50
Piping, cetol, screws, silicone $100
TOTAL $1310.
(Note: labor is an estimate of what I think that it would take to redo the job with the right tools and a fully formulated game plan. It took me longer because I was learning to use the tools, starting and stopping, experimenting with jigs, fabricating in pine before risking the teak and just feeling my way along.)
Planning/measuring/ drawings/getting materials together 40 hours
Fabricate frames 4 frames X 24 hours each 96 hours
Install new core material 4X3 hours 12 hours
Remove old windows/ route out core 4 X 4 16 hours
Make templates/cut out new window openings 4 X 2 8 hours
Cut Lexan, drill, countersink and prep Lexan 8 X 2 16 hours
Install window frames in boat 4 x 3 12 hours
cetol, then install Lexan 4 X 1 4 hours
interior trim and finish 4 X 3 12 hours
TOTAL 216 HOURS

Recent Comments