 Log In
 Register
 Home
Home


 Topic RSS


 Offline


Awesome advice! Our slip is truly WAY far down. Travis wanted staggering distance from the yacht club, I told him the walk would do us good. So we will be on the far side between two other very salty boats, I believe one is a live aboard so hopefully sympathetic to our plight. I'm not talking doing a whole deck job on the water, but if I can surreptitiously do some work, I'll be content.
Regarding the headliner, we decided that its just coming out right now. Actually August 7, our next day to devote to boat work. It's just a cesspool of grime and I'll be happier with bare fiberglass and wires. So we are planning on a kamikaze session of numbering pieces of vinyl with a sharpie (to use as template in case we replace with fabric) rip out, pull out rusty staples, clean it up, scrape off any glue globs and see how it looks. If its not heinous, we may just sand it a bit and apply a primer. And then figure out what we want permanently later on. I'm not worried about an "industrial" look, actually. As long as its clean and the current infested vinyl is GONE.

 Offline
heheheh.... your going to hate life... the staples are evil personified. The little bit we have pulled down has been very not easy. You can just rip it out brute force sorta but it leaves lots of edge bits behind with the staples. It took me 3 hours or so to get 95 percent of the staples out of where the piece in the head was. the other 5 percent had rusted to the point that you can't pull the legs of the staples out. You grab the top of the staple and it just pulls off the legs. Most of the ones you can get out are very hard to pull. First get an awl or other sharp pointy prying thing and a wood block to pry against and try using that to pull the staples. That might get it started or get one leg out. Then use needle nose pliers to pull rest of way out. Now repeat 10,000 times for whole boat. Just the head alone probably had 400 plus staples in it.
I like the looks and the functionality of the vinyl but the impairment to accessibility to deck hardware behind it is a veto for me. I have seen boats where they put a long slit over hand rails and other hardware and then installed a zipper in those places. It was functional and looked good. Lot of work though. 🙂 We will be going back with luan wood panels and hinged storage compartments in the overhead that gives us access to the deck hardware from below. I will tape reflextix in place against the fiberglass for insulation. Easy to pull down and tape back in place. Won't looks as nice when you open the overhead compartments but I like a warm or cool boat 🙂 depending on the time of year.
lol.. we are not only beside the dock master's boat but almost dead center on the marina office 5 slips down the dock from the main boardwalk. We have been catching hell lately because of some of the board members complaining about stuff on deck. We have water proof 5 gallon pails and other similar stuff plus various other project materials sitting on the coach room under the hard dodger and under the cockpit where we have a tarp running from the aft end of the coach roof all the way to the dingy davits. According to most it is just one or two people complaining though. I just about laughed at some of the complaints though.. One was about our bean bags on deck. You know how most of these boats just have a flat deck aft, well we decided not to build seats etc.. We bought two large long neck bean bags from west marine. Absolutely love them. I was tempted to tell them that when I saw them pull their cockpit seats out of their boat I would get rid of my bean bags. We just listened and straightened
Honestly.. If your a everything should look perfect sort of person then our boat is going to get on your nerves. Were busy living here which also includes a two year old with a tricycle on the foredeck 🙂 It worries me the attitudes I see slowly moving through our society. I can remember driving past those country eyesores, you know the falling down barn or a few dead cars on blocks. This is way out in the country.. Now days most of that is gone... They have zoned it out of existence and taken the people to court to make it go away. I always thought that in a admittedly ugly manner that it gave character to the country. Nothing creeps me out more than driving through a newer neighborhood that has a POA/HOA Everything looks the same and is rubber stamped out of sameness. 30 miles inland near where we live it is slowly becoming that with the county zoning laws now in effect. you don't even see farm equipment sitting out on farms anymore. It seriously lacks character. We are becoming a nation where not just by social pressure but by law the nail that sticks up is hammered down.
Offline
Haha...yeah it's gonna suck but I'll be happier once it's gone. Ill make sure to get another needle nose pliers to take with is. Fortunately Travis doesn't read the forums so he won't know quite what's in store. :-). I'll make sure I have some rum and diet and limes on ice in the cooler to sooth his nerves. But we'll work together. I'm just as hands on as he is, totally content to get dirty to get a job done. In my past life, when I was married, I was the one that did the landscaping and the home improvement stuff. It's nice to have help now!
I hear ya about the laws. And in California, I can promise it's worse. Another reason I think we will do what needs to be done now for safety, and plan the other big projects for after we take off. I figure Mazatlan would be a good place to stop, rent an apartment with AC for a couple months and finish stuff there. I'm certainly environmentally aware, but the regulations here are just insane.
I showed T your spice rack...loved that! We cook a lot so it's nice to have that stuff handy and by the stove.
Offline
East coast is still pretty easygoing in some areas re work done. Tightening up all the time though.
We love the spice racks.. still need more space for spices though. 🙂
scott
Offline

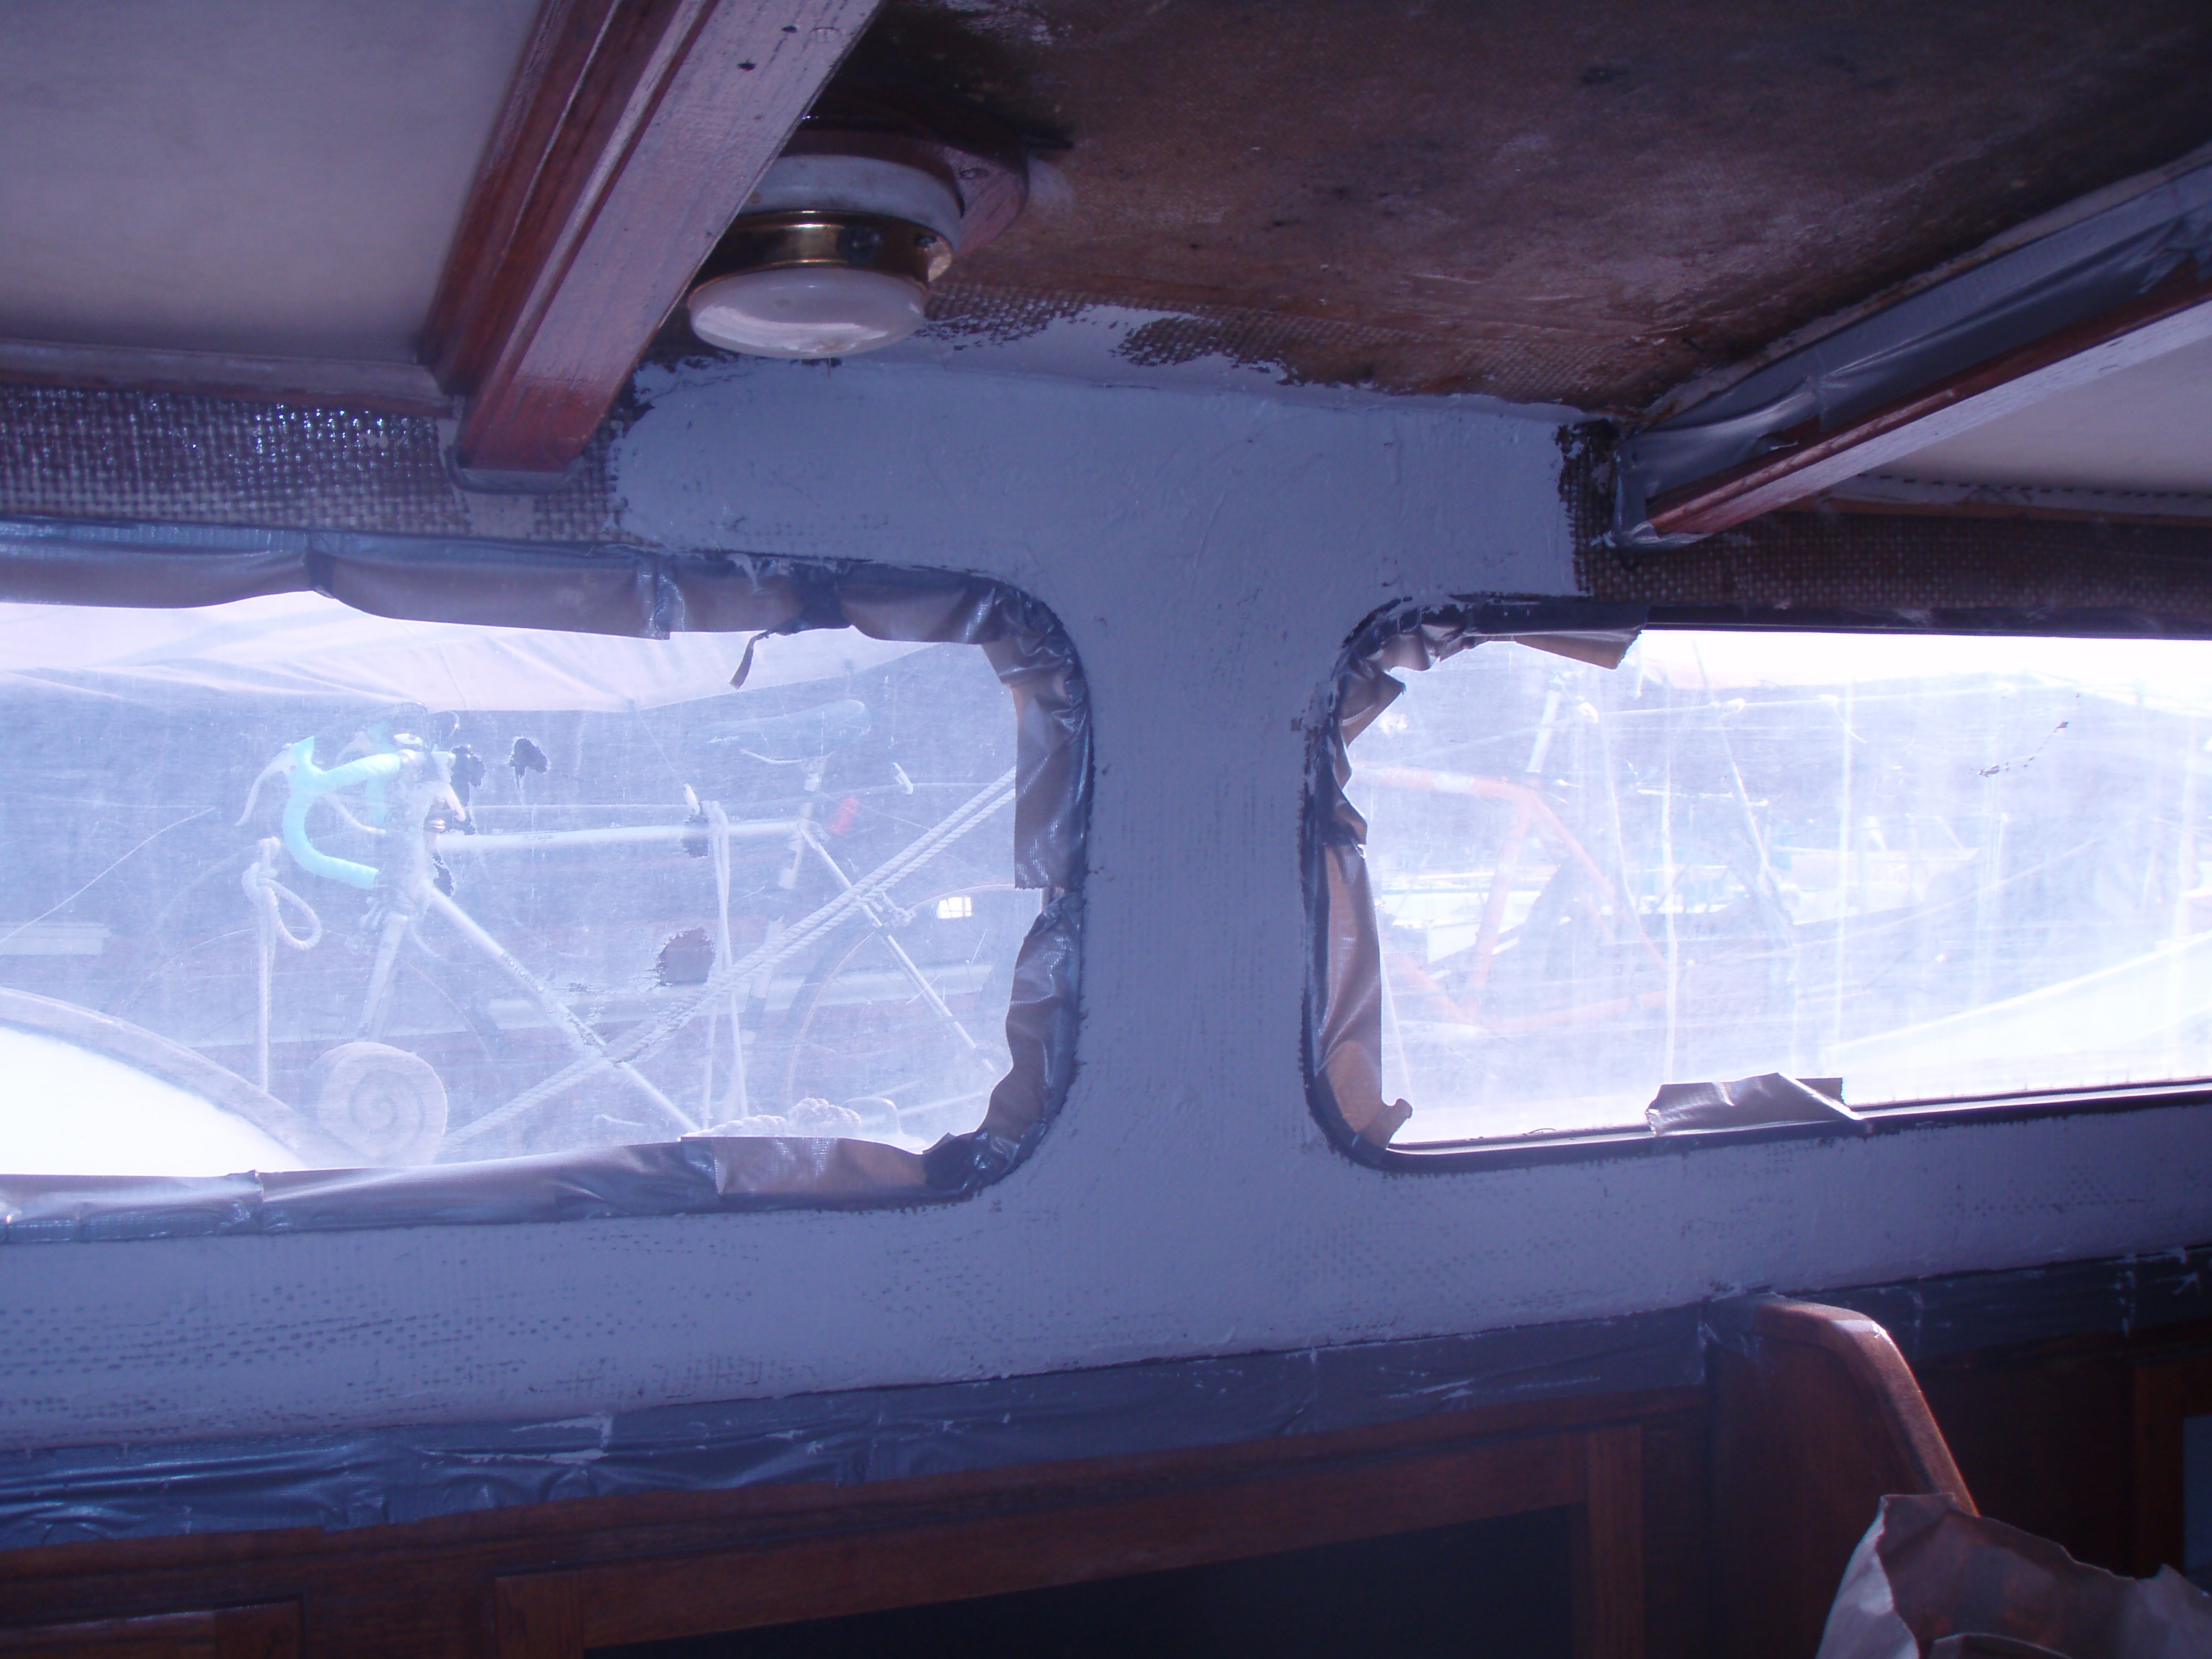
[Image Can Not Be Found]I just finished ripping all my headliner out of the boat. And the super annoying staples and tack strips. Found some rot,abandon hornets nests and rusting staples. This took the better part of two days to demo all of it. It occurred to me that having the raw fiberglass exposed for a season will be a very good way to see if there's any leaks or other things going on that the headliner was concealing so well. I really don't care for things that make it difficult to trouble shoot problems. Especially on a vehicle that's almost 40 years old.
This pic is when I did a little testing to see how the raw fiberglass would fill,sand and then paint. It's ok for now. I'll be breaking out the heavy duty sander this weekend! I'll probably put up wood strips next year if the look starts to bug me.

Offline
TWO days just to tear it down?? You mean I won't have the project completed in a few hours with no unanticipated delays and be enjoying Sundowners on the dock by 5 pm? Hehe. Ok I felt guilty and told Travis that it is probably going to be the job from hell. The first job from hell we encounter as new boat owners. I think it's looking good! Even the text painted part looks better to me than what our headliner does. And it will let us figure out where the worst of the rot is hiding. I'll be looking forward to what you decide on replacement. Definitely better to be something you can remove when needed.
Offline
CAE said:
Your bows on the ceiling look totally different than ours. Ours are fiberglass with just a teak trim strip on the bottom. Are yours fiberglass that is just wrapped in wood or are they all wood beams?
Offline
when your using a power sander in the boat make sure you use one with a good shop vac attachment and a great shop vac. It will help with the sanding dust a lot. Even so I would advise removing all cushions and other fabric from the boat as dust will get everywhere. If you can tape up plastic to contain the dust to just the area you are sanding it will help a lot also. Fiberglass dust gets everywhere and itches forever 🙂 I have put off some projects inside indefinitely just because of the sanding dust issue and us living on the boat.
Offline
Ours are like yours, Scott. Just teak strip at the bottom. Amazing how different each one seems to be.
Offline
As old as our boats are, between 30 and 40 years for most of them, it is sometimes hard to tell what was factory vs an owner modification. Some original owners spent more money on their new boats by having upgraded features or alternative layouts installed on their boats so even if its a bit different it is still factory. On the other hand a lot of owners have gone crazy over the years and upgraded a lot of the systems and or layout of their boats. Some are fairly easy to recognize as owner additions but there are some things that are so well done that you just can not tell it was added later.
Most of the differences I see between different boats are small interior upgrades and changes, and then on deck changes such as alternative layouts for running rigging and differences in bimini's and dodgers, davits or not etc..
Offline
I'm not sure about the main cabin bows. They might be solid wood. But in the V berth, it is fiberglass with wood strips over it. So, it's probably all glass.
I have a good shop vac system for the sanding and my cushions were all shot. I'm meeting with a cushion person on Sunday to estimate the costs for new one. I'm hoping for not too much sticker shock as he's a friend of a friend. I'm going to practice going in and out of my slip today. I'm still not used to moving this monster around tight areas.
Offline
Get ready for sticker shock anyways. We bought new foam and fabric and redid everything but the pilot berth in the boat ourselves and I would estimate we spent a grand on materials alone... about 7 dollars a yard for the fabric and cheaper foam... I would spend the extra and make absolutely sure you get good foam.. We would probably explore a different fabric this time. We purchased from a local company in three separate orders to break up the cost as we were doing the project over about 5 months or so.. Somehow we got different weight foam mixed up in the orders. Regardless of that none of it is holding up to full time sleeping or sitting on it as well as I would like. It seems the spots that have the heaviest use or where the most weight on it are softening up a bit already a year and a half later.
We used a acrylic fabric from Tommy Bahama with a pattern in it and while we like our crazy jungle pattern the fabric has been washed a couple times now and is piling up just a hair and the texture isn't as nice as when new.They seem to be wearing fine though.. no thin spots or anything like that. Also it seems easy to clean stains and such off.
Scott
Offline
Hope your friend gives you a good deal. I'm going to redo mine eventually but our foam seems solid and is still comfy. Fabric is is decent shape...just sort of ugly. 🙂 I picked up a sewing machine at goodwill..a Singer from the 1960's. Spent $25 on it and $75 at a machine shop fixing it. It's a dream! I quad folded upholstery fabric as a test and it sliced right thru it. I'm not experienced at sewing tho. Will start with curtains.
Offline
You may want to check out pre-made valances for curtains. They may make one that's big enough to cover the windows. If so, you won't have to sew anything. I did this for a camper van I had a few years ago. It was easy and relatively cheap to buy the valances on Amazon and put them up.
Offline
We have pulled most of our curtains inside down. It's on the project list. We have been discussing something with an insulated backside that can roll up out of the way but then maybe velcro to the openings to block light and create insulation. We put up shrink wrap insulation from one of those house kits on all the windows and port lights over the winter and it helped with heating a lot. So far we just left it on for the summer and it is helping a lot with the A/C also. It doesn't affect using the port lights but does impact seeing out a little bit. Just makes it a bit cloudy.
We have a mid 50's singer and it works ok.. I have found it gets out of timing easy and or the tension is hard to set. We found an old manual crank sewing machine for 60 dollars that is just a straight stitch and it is a beast. I would love to have one of the sailrite machines for heavier stuff though.
So far we have made our own cushions and Bimini on the boat with the singer. Bimini was pushing it at the corners where the fabric was was more than 4 layers thick for a 10 or 12 oz fabric. Sails would put a hurting on it I think. We repaired the jib sacrificial sun cover with the singer and any area that was a seam or toward the ends where the sailcloth was more than 2 layers thick bogged it down. It was frustrating.
Offline
Tension on mine seems pretty good. That was the problem before I took it in to machine shop. We will see when I go to fix the Bimini and sail covers. A sailrite is probably on "the list" but quite a few things ahead of it. I'm looking forward to doing curtains. I pulled the old to use as a pattern. Since I work 7 nights on (7 pm-0330 am) and then 7 off, I have 7 days where I can't to get to the boat. This will be a good distraction.
Offline
Pulled ours down last week...I started a new thread for input on how bad of shape some areas are. We left the headliner up in the v-berth for now...it's clean and looks good but it will probably come down when we do the deck work on the bow.
 Offline
I am in the long process of installing wood planking, wainscotting, after removing the headliner. Once the wood is installed then I'll remove it and put in insulation and remount the wood. (I will post progress pics after more is completed.)
One thing I have added in the vberth overhead is acrylic mirror (sometimes called "safety mirror"). I bought a sheet of mirror and cut it into strips for port & starboard sides then mounted it to the furring strips I've installed. The mirrors brighten up the shadows a lot, as hoped. However, since I haven't seen acrylic mirror used on boats like this, is there any drawback to installing it? What comes to mind is that it is not fire-friendly at all, in case that ever happens. If it breaks due to stress/vibration, I assume it would just crack like acrylic probably at the mounting screws. Acrylic can break with sharp plastic edges, but not otherwise dangerous. It is a bit pricy too.
Offline
Well, I've opened up the "whole can of worms" that is the headliner tear down. Talk about a project!!! All of our original ports were leaking and the naugahyde was starting to pull away from rusty staples in places. Of course, not being able to access anything underneath was the determining factor. We like the Jason Rose solution, and after reading a bevy of headliner replacement posts for similar era boats I think I'll be adding some insulation underneath too - Reflectix in between the furring strips and sandwiched between the bead board panels and cabin walls. Only caveat is that in order to use the affordable NFM Trimatrix ports, I have to keep the cabin thickness under 1.3125" and at .8125" to start with I only have .5" to play with.
Given I like to over-think things, I mocked up a cross-section of how I plan to install the bead boards and trim. The curved cabin sides are tricky...Please tell me if there's a more simple solution.

In the meantime I have about 8000 more staples to pull! I did invest in a nice pair of needle nose pliers and small flat head to help pry up the more stubborn staples - makes thing much quicker.
"The only thing that works on an old sailboat....is the owner!"
Most Users Ever Online: 175
Currently Online:
5 Guest(s)
Currently Browsing this Page:
1 Guest(s)

Top Posters:
Jonathan Oasis: 177
bobmcd625: 165
CAE: 150
mgav451: 143
Rick: 94
svbodhran: 84
Member Stats:
Guest Posters: 7
Members: 366
Moderators: 1
Admins: 1
Forum Stats:
Groups: 3
Forums: 13
Topics: 747
Posts: 3838
Newest Members:
Tools of the Smith, tonyflor, sailordad46, Spirare, BradHartliep, DuncanModerators: Patrick Twohig: 134
Administrators: Scott Carle: 1481
