 Log In
 Register
 Home
Home

 Topic RSS


 Offline


I know I have been pretty absent lately:) amazing how life that includes a new child will keep you busy. (our daughter is now 10 months old)
I have been going slowly nuts with boat deprivation. None of our projects on the boat have been getting done. She is still sitting with the fuel tank un-repaired.
As spring approaches I finally just said getting back to the projects is a priority. Though I know the fuel tank is the most critical I met a guy a year or so ago that does aluminium fabrication. A few weeks ago I bumped into him again and was talking about how I would like a hard dodger. He hadn't done much on sail boats but had worked for Grady white, Hatteras and other big boat manufactures designing and building the hard tops and towers for their boats. He had a boat and a top he was working on in his shop at the time and his work was absolutely beautiful. So I asked him to quote me on a aluminium frame for a hard dodger on Valkyr. Ouch!!!! Our budget is limited and his quote was significant. The just the materials at his cost exceeded a grand. I really wanted an aluminium frame for the weight savings. I also wanted someone else to build it as I hadn't gotten around to in in the last 18 months and probably wouldn't for another year if I built it myself. Anything that I built would be decent but much heavier and not as visually appealing. My wife knowing me well just said "go for it. at least it will get done":)
Then came a couple weeks of design,redesign,pay a deposit for materials,one last meeting on the design and finding that it wouldn't work the way I had envisioned so back to the drawing board and redesign again. By now both they and I are feeling a bit frustrated. What happened is that I wanted to incorporate a traveller into the top of the hard dodger so I could move it from near the transom. We had a design for this but when we did the final on deck measurements we found that to give room between the boom and the dodger for the blocks and such that it pushed the dodger top down very low so that it would be harder to get in and out of the companionway. Also because of how low it was the support legs assumed some very awkward looking angles due to the aft windows. We couldn't put the forward leg of the traveller arch in the center of the window as there wasn't enough structural strength there to support the potential loads. We needed to move that leg forward to between the windows for the strength. After a couple of days and many hours of how about this and what about doing this way,I finally came to the conclusion that we could do it but it would look ugly and be uncomfortable to get under to get to the companionway.
I called him and told him to just disregard using the dodger for the traveller and that we were going to simplify to just being a solar panel support with hand rails on top for security and clearance to get in and out of the boat. A couple of days later he showed me a design that he had come up with that I absolutely loved. It was very strong and had lovely lines.
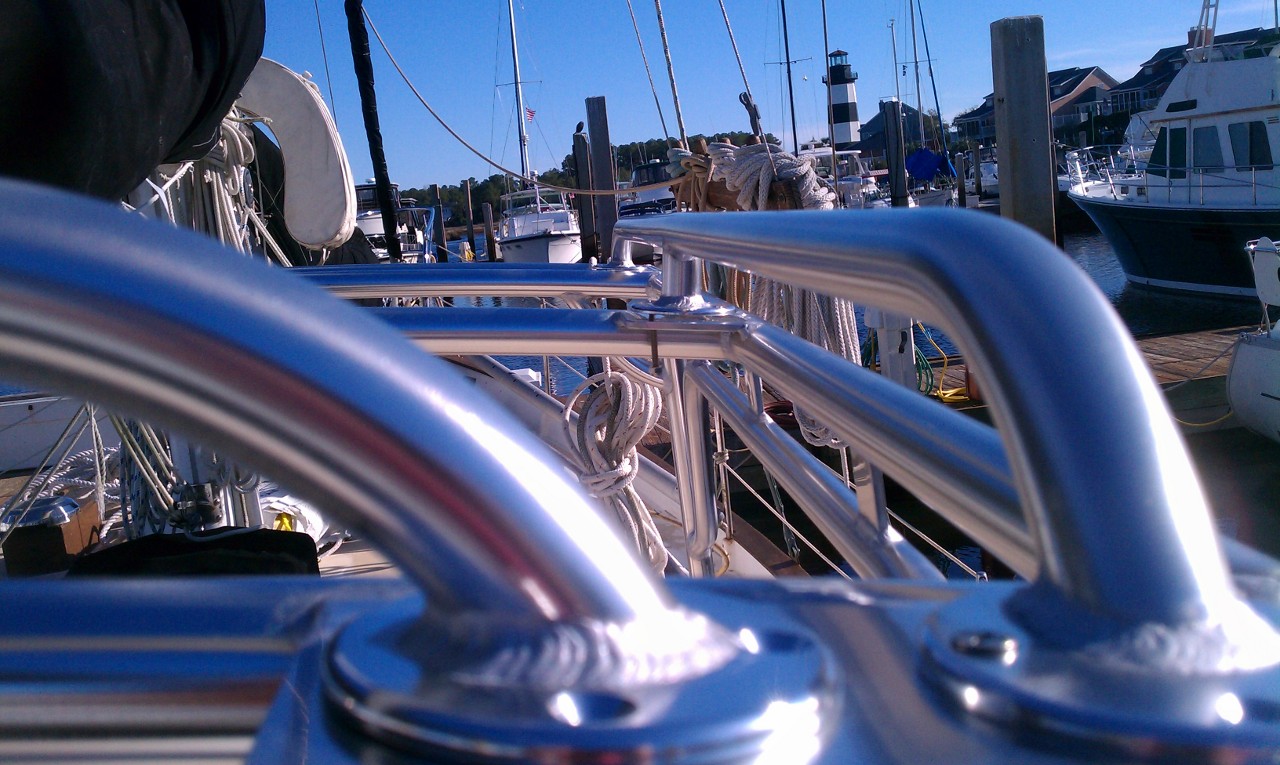
It still needs for me to build the roof over it. The hand rails and aft boom protector rail are just temporarily bolted on. They will bolt on through the roof when finished and will be part of what holds the roof onto the frame. The frame is made of 1 1/4 inch ID 1/8 inch wall anodised marine grade aluminium ( I think the OD is 1 5/8 inch) . The hand rails are the same grade aluminium in 1 inch ID size. For deck pads we used hinged pads that will allow me to remove four large stainless bolts and pull the entire top off the boat. As it sits in these pictures it is just temporarily screwed to the deck with 8 screws. I still have to drill out all the mounting holes fill with epoxy and then re-drill through the epoxy plugs where the coring was. I was able to grab the frame and with all 188 lbs and all my strength yank and pull on the frame and it didn't even budge.
Amp Welding is the company that did the work. Talk to Tom Arnold the owner and tell him I sent you 🙂
So after all that build up here are some pictures of the finished frame sitting on the boat.
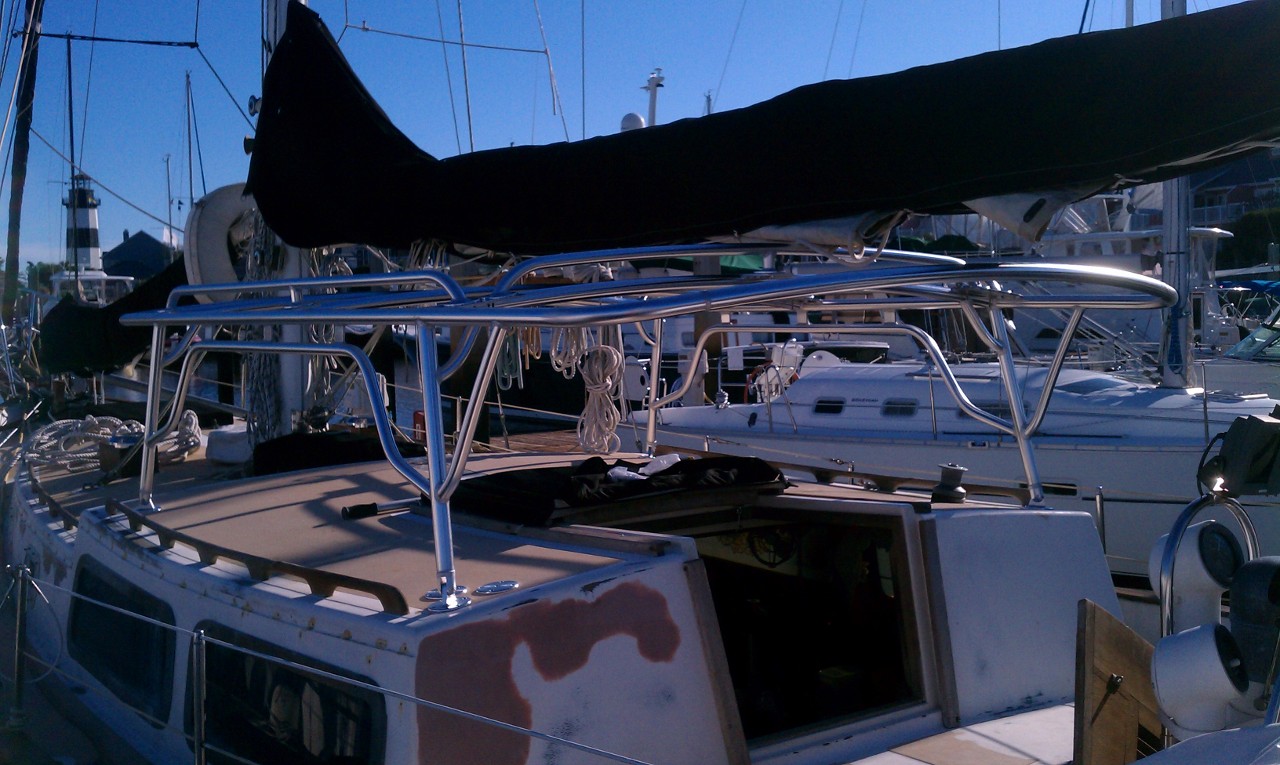
This first picture is from aft portside view.

Aft starboard view

one of the things we were concerned about was visability while sitting or standing at the helm. There is great visibility under the dodger and when standing you can see very well also.

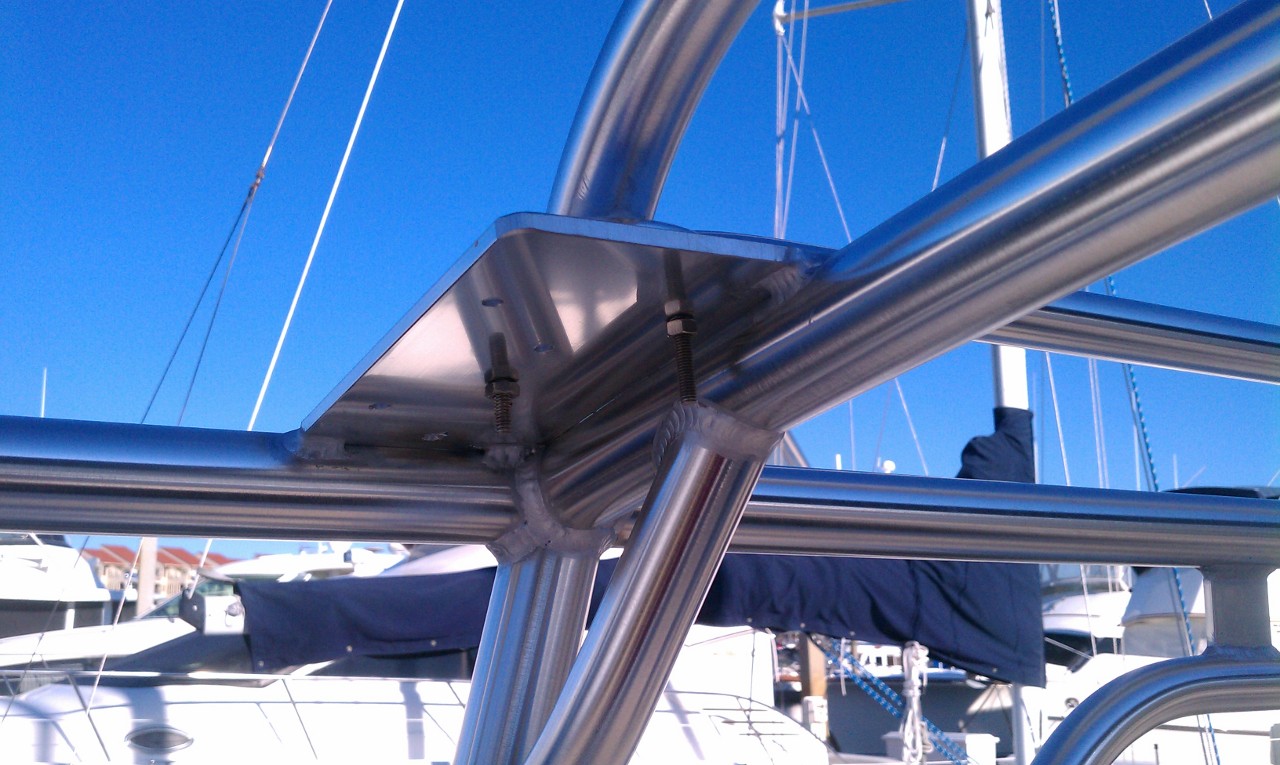
aft portside view of handrail and boom protector meeting at the mounting plate welded into the frame.
Close up of mounting plate and handrail and boom protector pads temporarily bolted to it.

underside of same mounting plate.
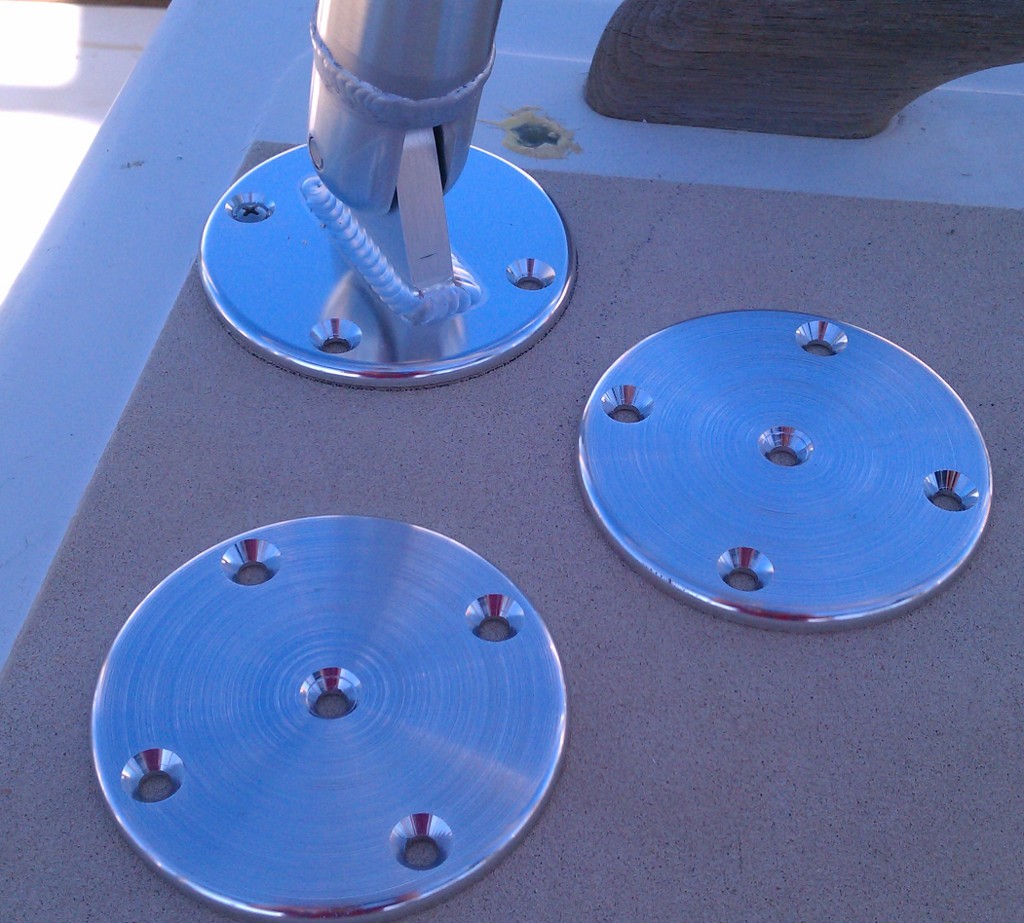
close up of the deck mounting pad and the backing plates that will be installed on the underside of the deck inside.
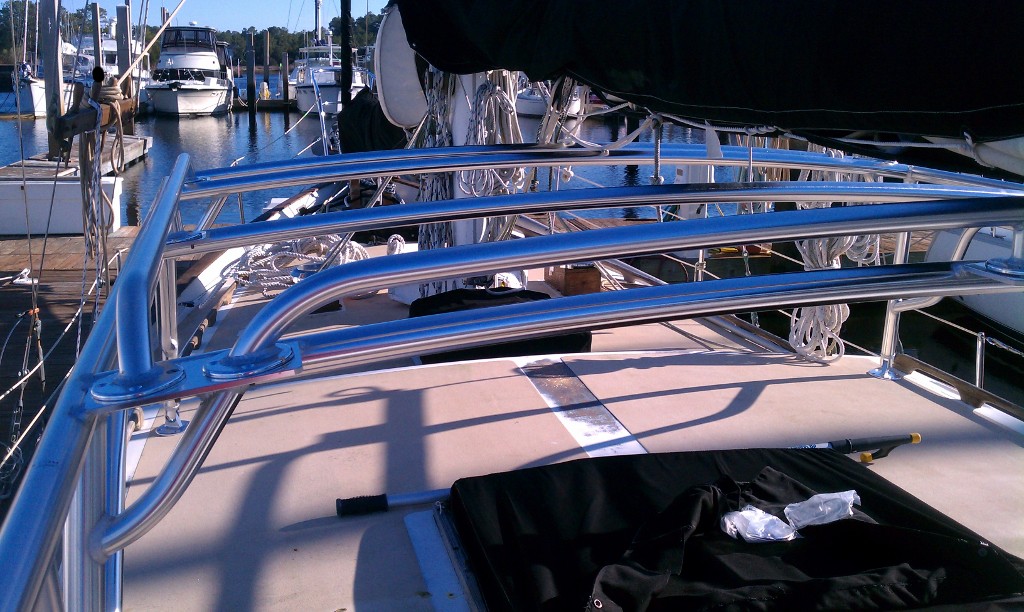
View down the starboard side of the dodger at handrail level.

 Offline
What kind of windage do you think it will add. Looks beautiful and big enough to give a large profile to the wind. Any guesses on effect to sailing performance or stability?
Also what sealant are you planning to put between the plates before bolting thru?
Offline
I am not sure about windage. It is 27 inchs tall above the coach roof. about 7+ ft wide and 9 feet long or so…I will have to measure it to get exact dimensions as they changed the length on me from the initial design to the final design. Right now the whole thing is weighs in at about 80 to 100 lbs. When I get the roof and solar panels on it I expect it will hit about 270 lbs total. I went with the aluminium and the high cost of it as a material to keep the weight down. We are planing on putting isnglass panels around the sides for cold weather etc.. I'm unsure if that will create more windage or reduce windage by removing the sail that the top of the dodger will form. I will report on it after using it for a while.
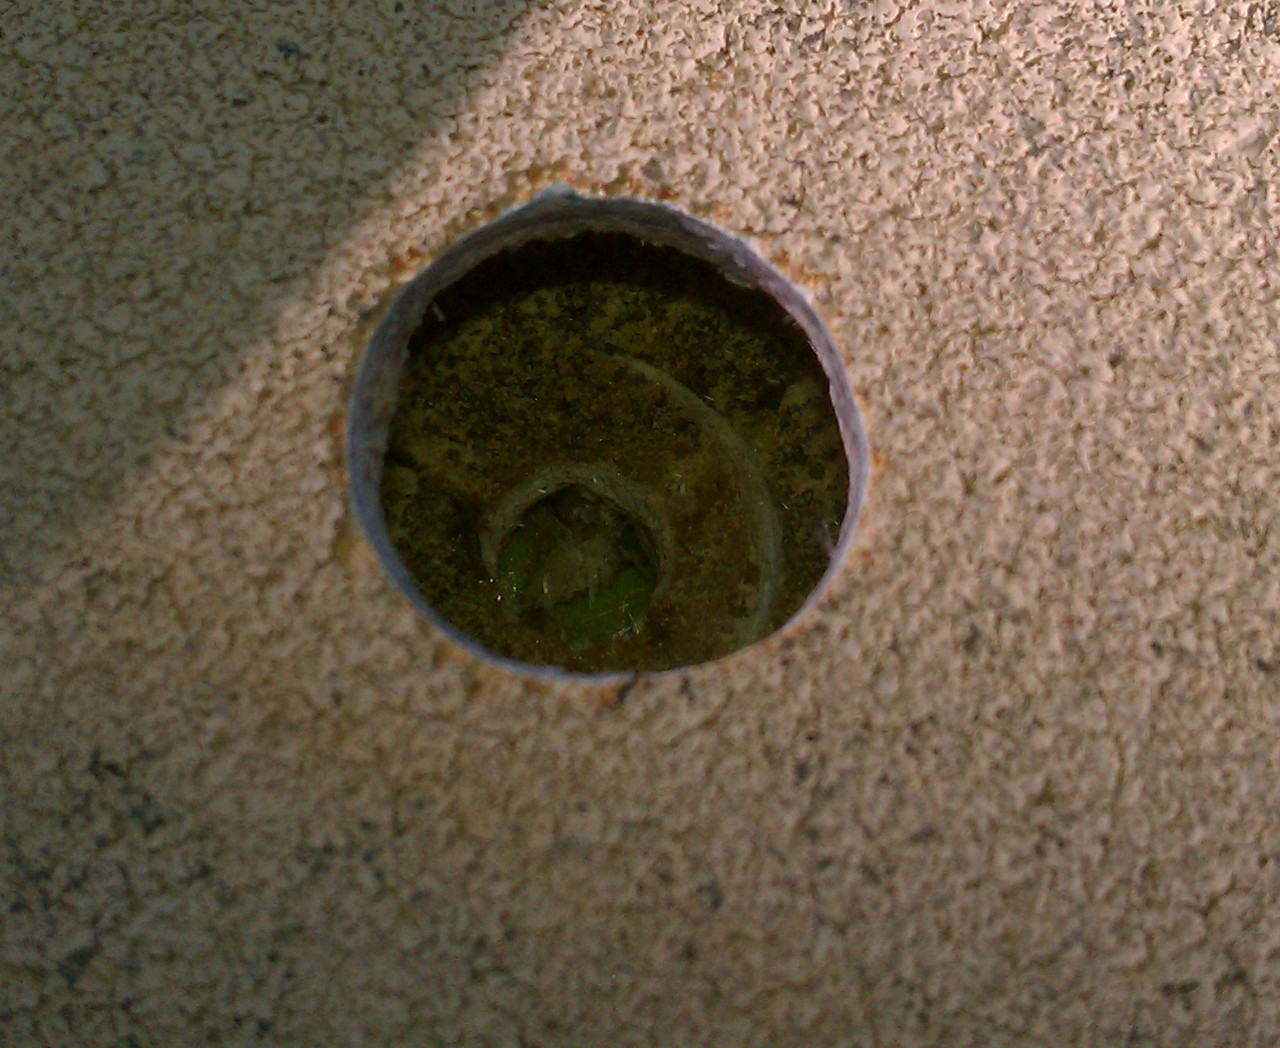
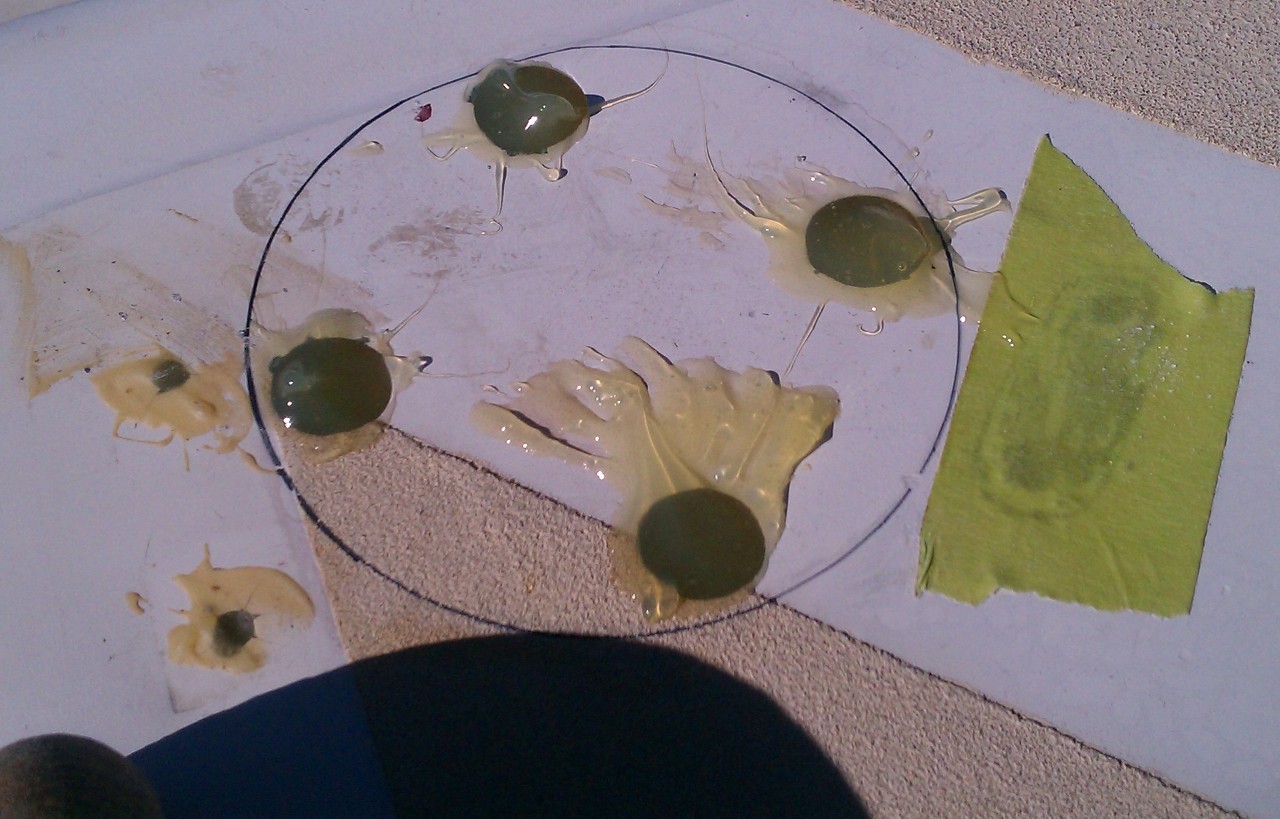
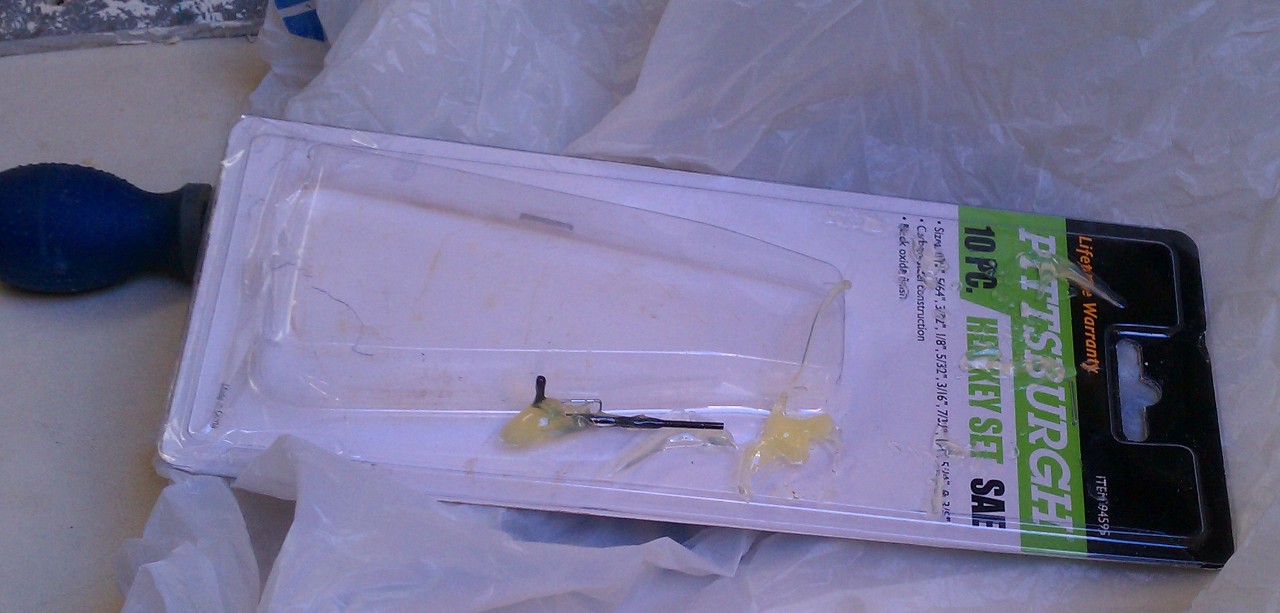
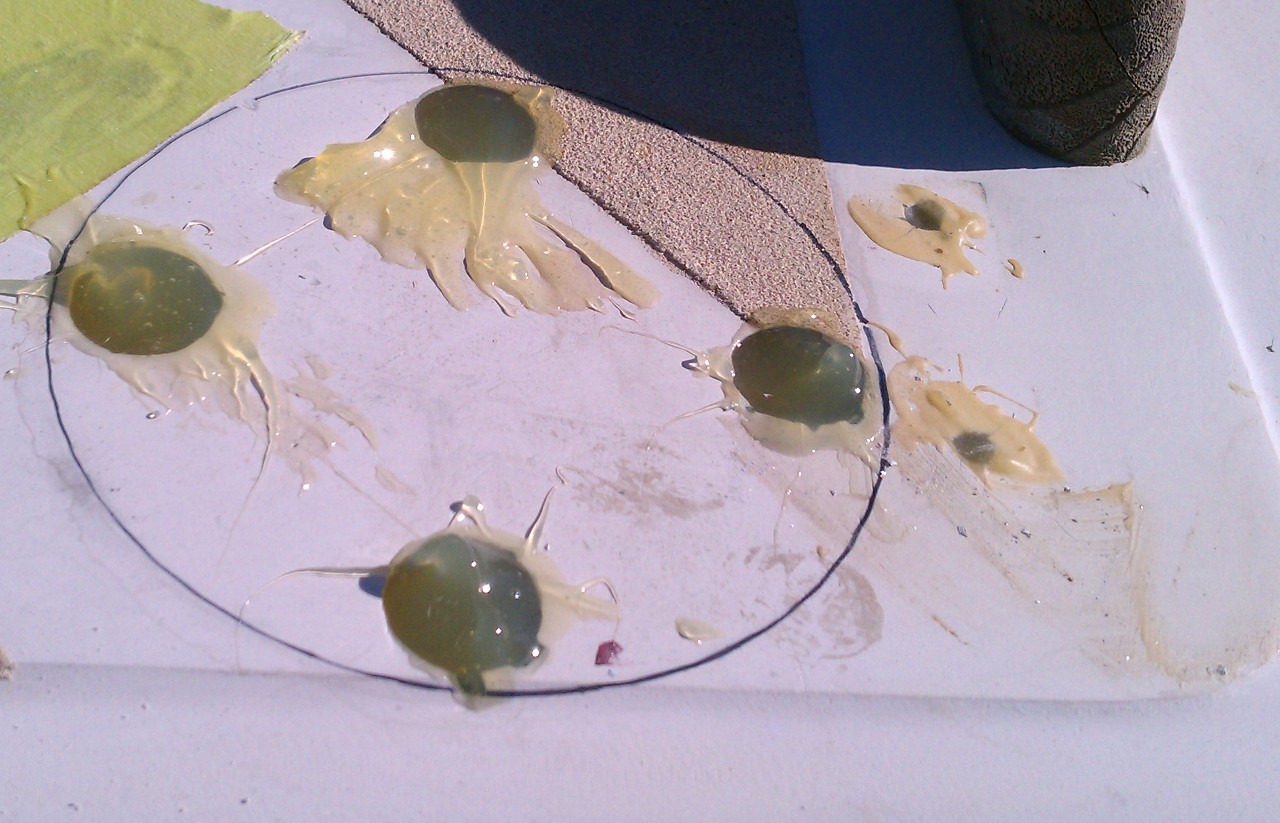
I just finished mounting it today. I drilled and routed out the core yesterday on the deck and backfilled with epoxy. I drilled the pilot holes with a 1/4 inch drill bit all the way through the deck. Then drilled the top layer of glass over the core with a 3/4 inch bit. Then used an allen wrench in my drill to take out the foam core. I think it created a empty cavity about 1 1/2 inches in diameter. Then I use one of the caulking tubes of west system two part epoxy and injected it into the holes.:) after taping over the 1/4 inch holes in the inside of the boat. Didn't want epoxy dripping out on to the various parts of the galley,pilot berth and settees. I used another allen wrench to make sure that there were no air voids after injecting the epoxy.. the epoxy is pre-thickend so it is pretty stiff. If I got air out I kept adding epoxy till it stood proud of the deck. I did this to all 16 holes.
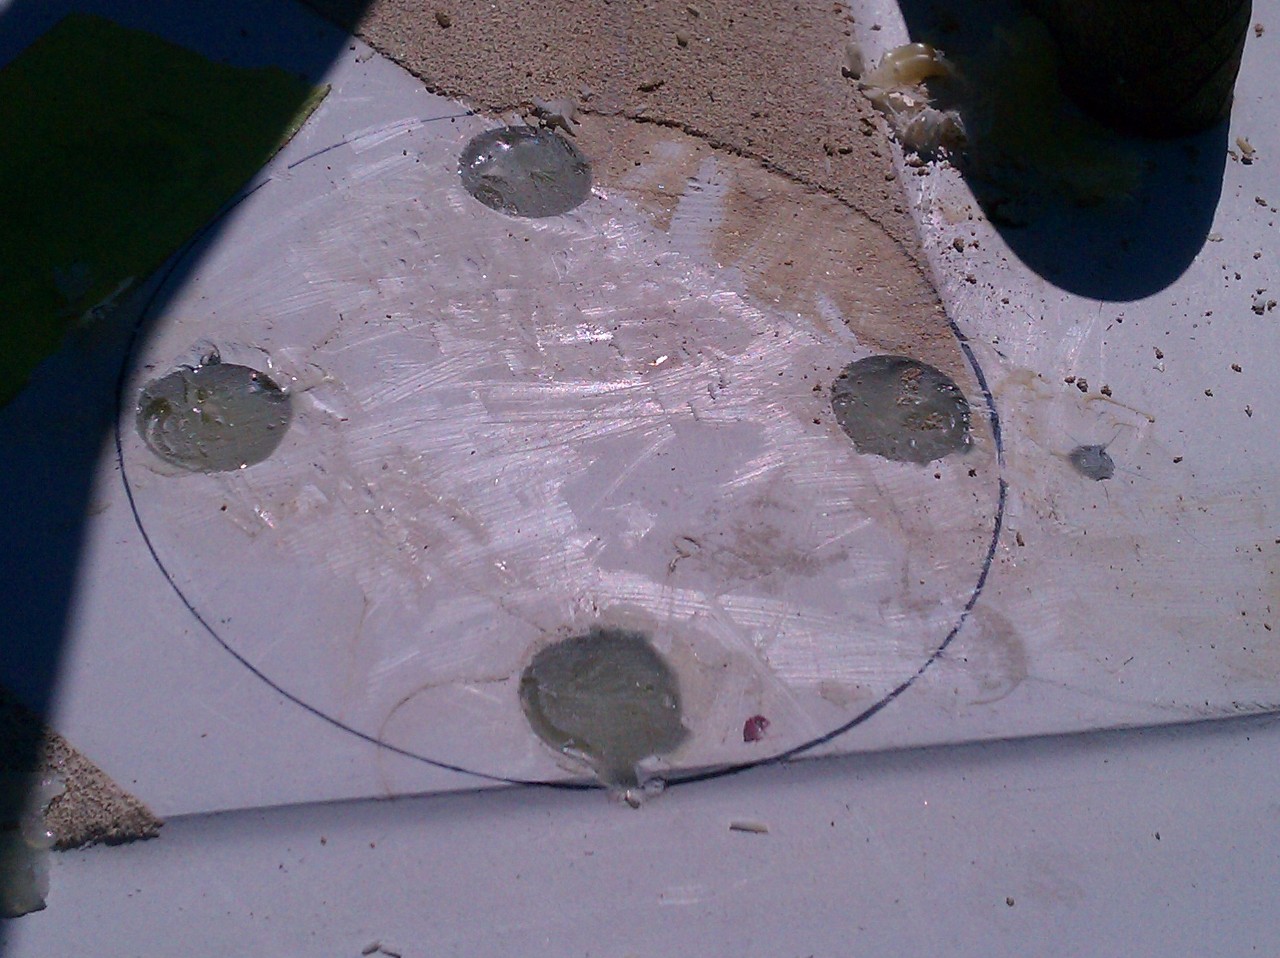
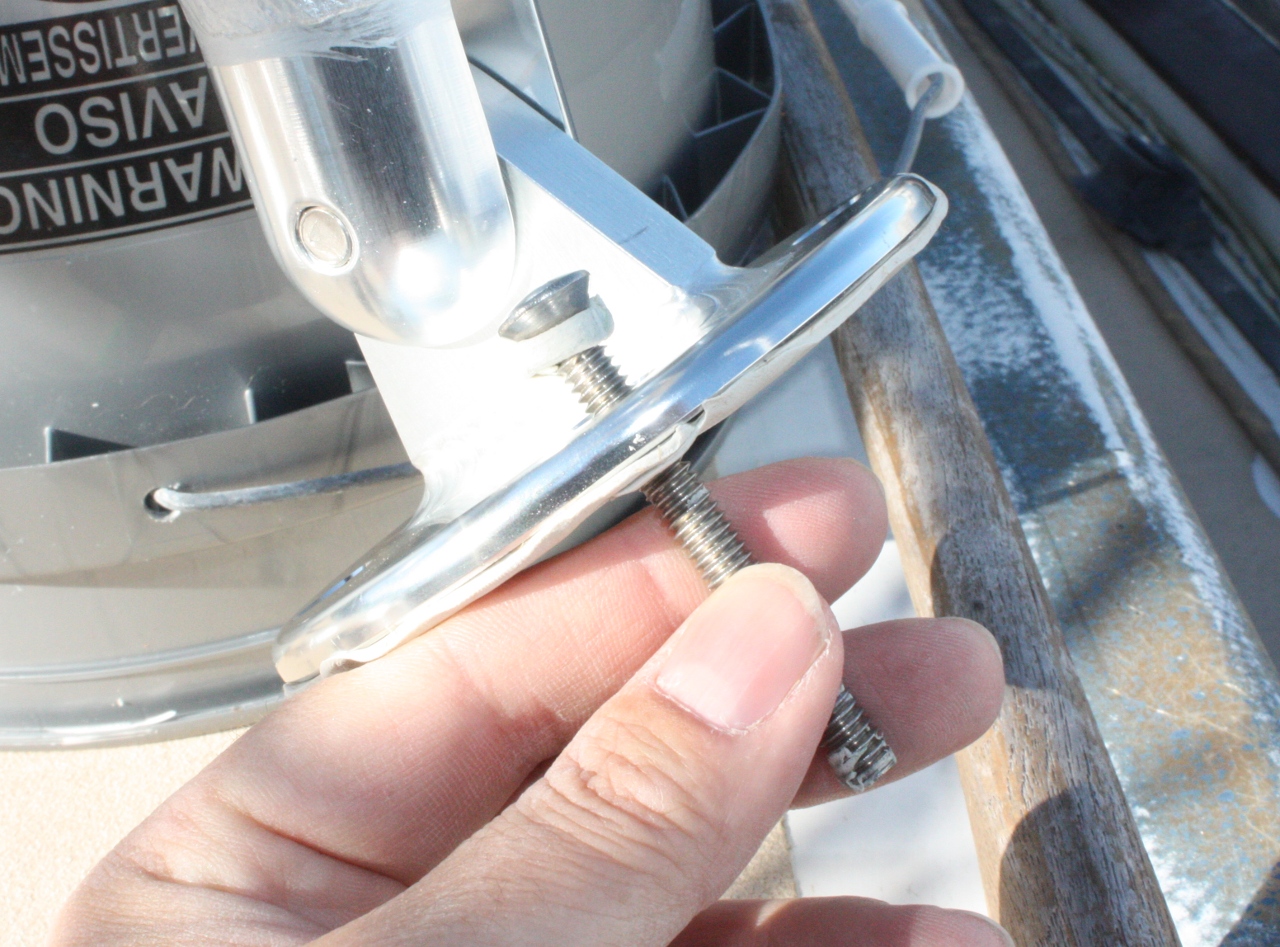
Today I came back and used a chisel to take off any epoxy that was standing proud of the deck. Then I lined up the hard doger again and marked all the holes on the back two legs. Moved the dodger frame again to the side a bit and hand drilled all 8 holes through the epoxy plugs I created yesterday. Again I used a 1/4 inch drill bit as that is the size of the holes in the alumimium pads on the legs of the dodger. After that I took and dropped a couple big screws through the rear leg/pads/ into the deck holes to fix that end in place and then marked the front legs. I then moved the frame and drilled those 8 holes. 4 holes per leg. After that I got a countersink bit and counter sank all 16 holes just under a 1/4 inch. Maybe an 1/8. Then a trip to the store for 16 2 1/2 inch 1/4 inch machine screws in stainless.:( 23 dollars for 16 of them and lock nuts to match.. I bought a extra bolt and two extra lock nuts but didn't need them:)
I went all old school on sealing the deck pads and holes. I used butyl rubber. I ordered a bunch of it in a white color a while back in 50 ft rolls because I knew I had this project coming up. I raised the legs up 8 or 9 inches and rotated the pads till I could access the bottom of them and doing the back two first totally covered the bottom in butyl and then punched out the holes with one of the bolts. I then rolled a small piece into a thin roll and wrapped it around the bolts just under the head of the bolt. Inserted the bolt into the pad till that roll squished and then made a bigger roll and put it around the bolt up against the bottom of the pads. I sorta formed it into a cone so that when the bolts are tightened it would squish down into the countersunk top of the holes and form a compression O-ring of sorts and totally seal the hole and threads. We then carefully dropped the frame down while guiding the bolts into the holes. Surprisingly everything lined up and fit perfectly on deck. I then had a friend drop by just in time to use a screw driver to keep the bolts from from turning while I used a racheting wrench below decks to tighten everything down. I used identical size and bolt pattern aluminium pads as backing plates below deck. I did not bed them or the bolts below deck. I had to wallow out 5 out of the 16 holes on the backing plates below deck because the bolts were not perfectly parallel. The worst of them was only about 1/16 of an inch out of alignment. I felt pretty good about that given I drilled all the holes by eye. Not sure where my drill with a bubble in it went. though on second thought I would have messed u if I did that a the deck has camber and the holes needed to be drilled 90 degrees to the camber,not to level. We tightened all holes fore and aft and then starboard and port on each leg. Going back and re-tightening after getting the initial round done. I did not try to tighten it super tight but did get it very snug. I will go back in a week and tighten once more. The butyl rubber needs time to ooze out as the initial tightening takes affect. Done this way it should stay water proof for the life of the boat or until someone spins a screw messing with it and breaks the seal created in the area that was countersunk. The butyl rubber should stay soft and pliable for another 30 years. I have stuff that was bedded by the manufacture on valkyr that used butyl and it is still mostly pliable. What they didnt do is replace the core in the deck with resin or countersink the topside of the deck before mounting hardware. Even not doing that most of the hardware on valkyr still didn't leak.
I took pictures of the process and will post them when I get a chance. I'm on my netbook sitting on the boat right now and don't feel like playing with pictures with this computer.
Ok I got the pictures off my phone and here are a few that show the above process.
The hole in the bottom is 1/4 inch. This is the size of the bolts that will be used to mount the hard dodger. In this picture and the next couple you can see where I wallowed out the foam core.
Starting to fill the holes with epoxy.
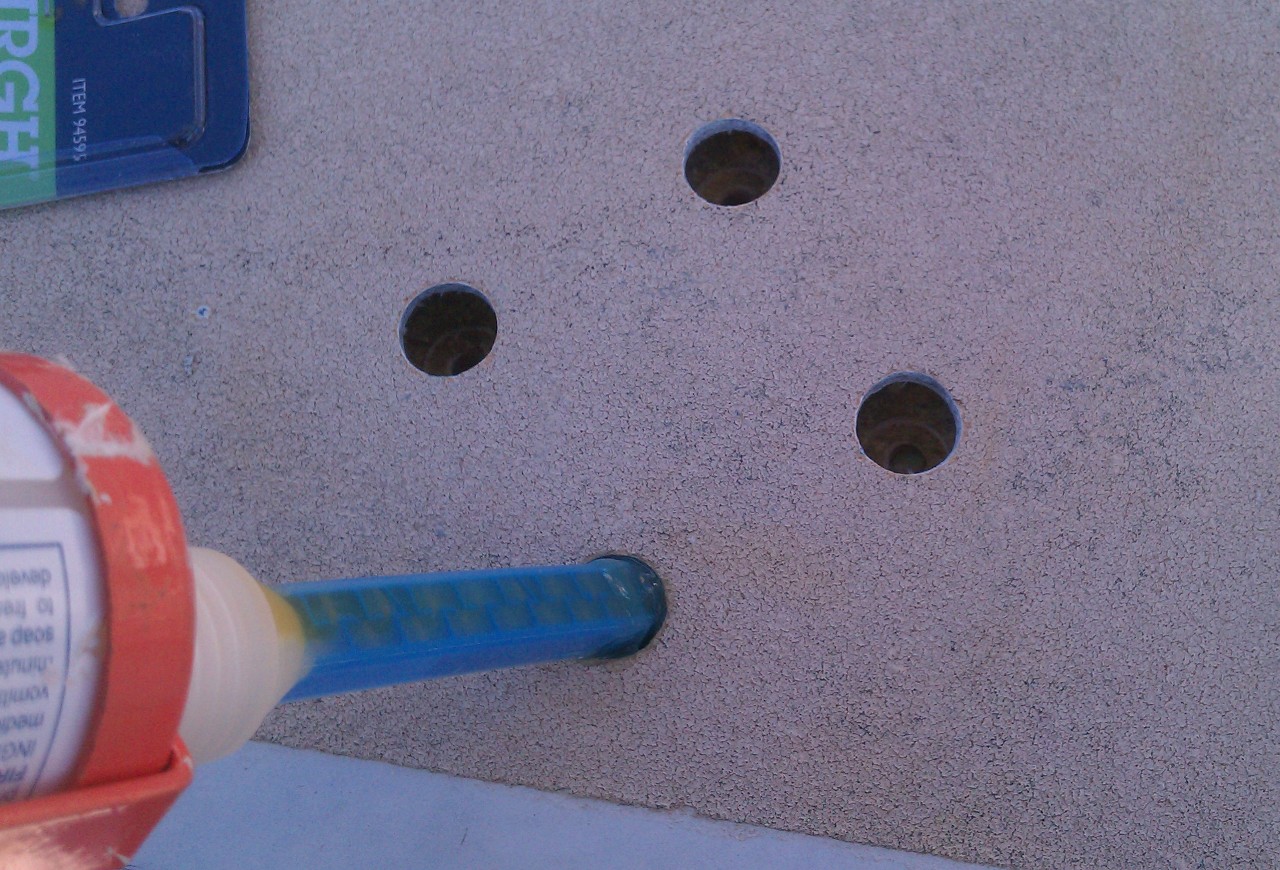
More epoxy 🙂
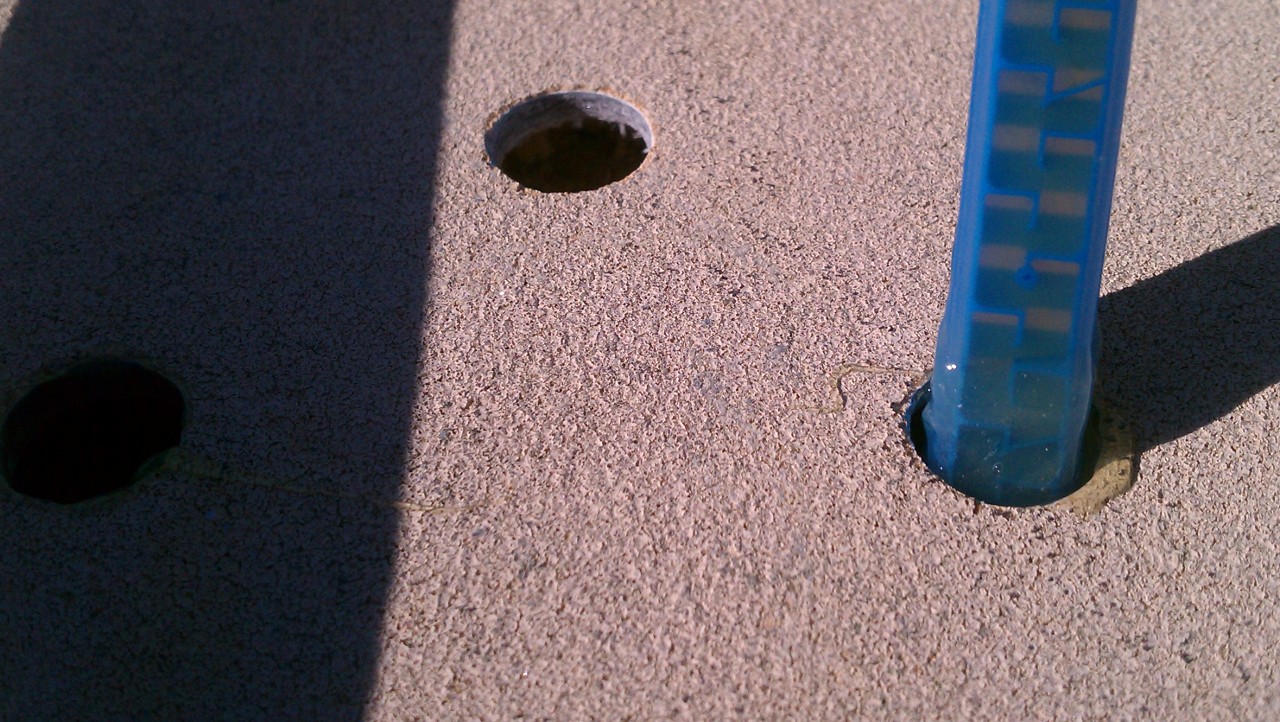
aft starboard leg holes filled with epoxy. Notice how high the epoxy is mounded..
I bought a cheap set of sacrificial Allen wrenches for wallowing out the core and for making sure there were no air voids in the epoxy once it was injected into the holes. I had to add epoxy to about 1/3 of the holes because of air trapped in the hole.
I'm not sure if this displays it well but the epoxy shrank a bit over night as it hardened.
I used a wood chisel to smooth the epoxy out and make the area the pad would sit on flat. I even took down the non-skit where the edge of the pad would sit. I would have sanded before bedding here if I had been using 5200 or some other similar product but with the butyl I didn't worry about it. The butyl has little to no adhesive quality/strength of its own and is just a bedding compound that fills and seals between the pad and deck. The bolts are what hold the hard dodger on. I think 16 1/4 inch stainless bolts will do the trick.
scott
Offline
Ok here are the pictures of bedding the pads on the legs on deck.
First I covered the base of the mounting pad with the butyl. I comes on a roll about 3/4 inches wide and just less than 1/8th inch thick. Then I used on of the mounting bolt/screws and punched out the butyl over the holes.
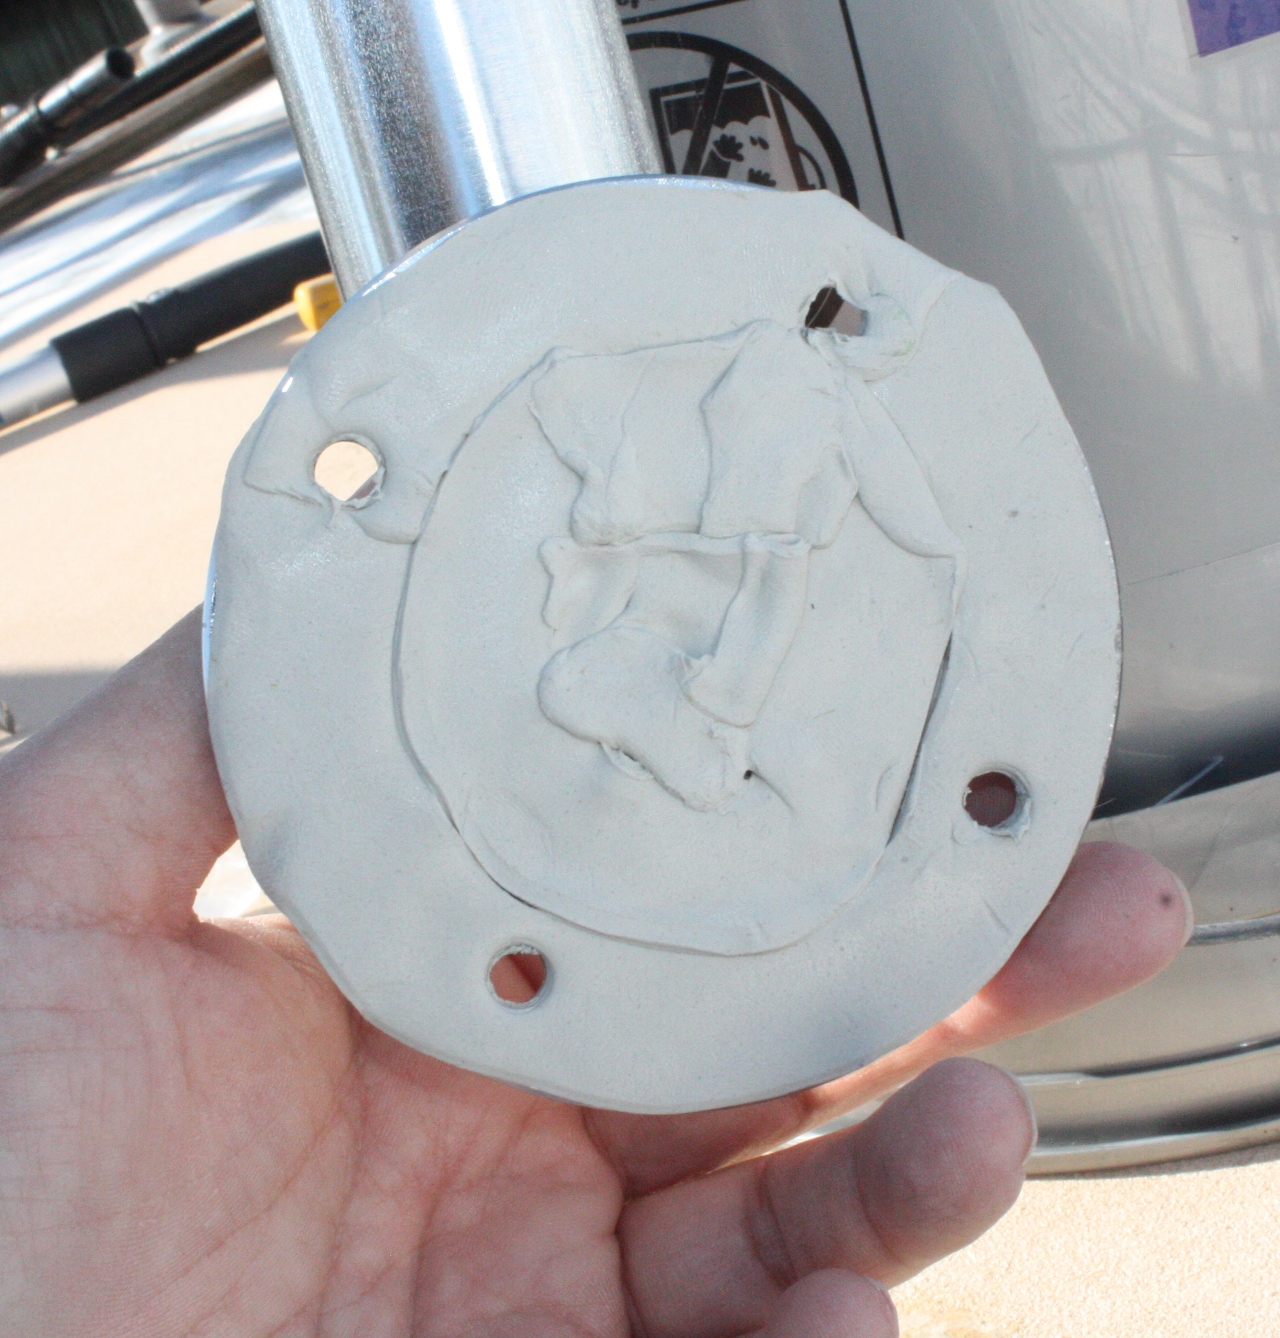
Then I took and rolled a small piece into a thin tube and wrapped it around the bolt just under the head. When inserted into the hole in the pad this will seal the screw head from water in the hole.

You get the idea here. 🙂
Then you take larger pieces of the butyl and create a cone shape on the base. These pieces will go into the countersunk portion of the holes through the deck. As you tighten it all down it will force this material into the threads of the bolt and form a sort of o-ring of butyl around the bolt to totally make it water proof.

You can see here after tightening it a bit that the excess butyl is oozing out. The secret is to tighten all the bolts, wait a bit, tighten a little more and then wait a day or two and tighten it a little more as needed. You also need to have someone keeping the bolt from turning as you tighten. If the bolt turns it can tear the seal of butyl material you have created and create a leak.
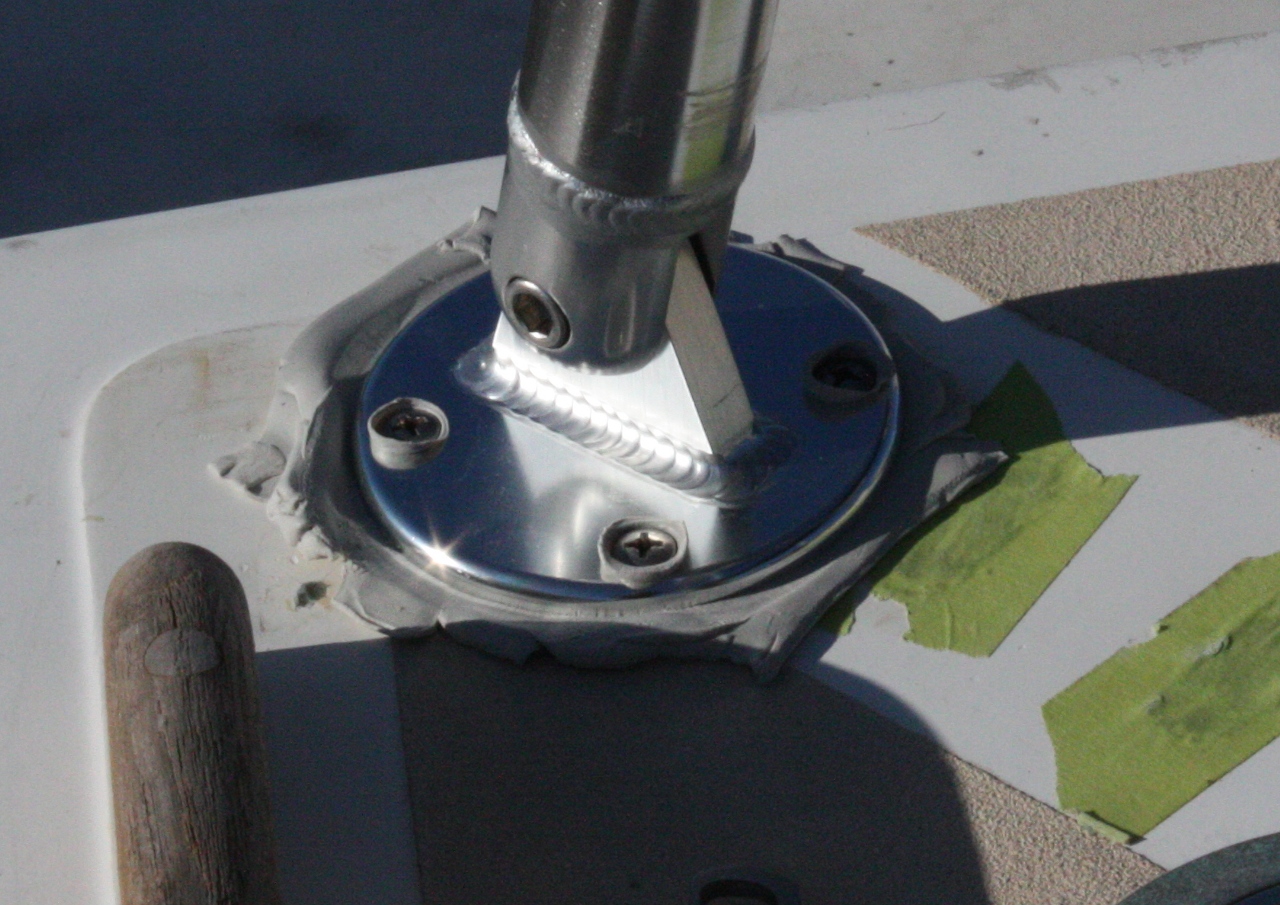
Another close up of a pad after the initial tightening. After I had all of them tightened up I went around with a knife and cut the butyl around them neatly and peeled up the excess. The next morning it had oozed more out around the edge of the pad. I will give it a few more days and then give another small tightening. The butyl should stay flexible for in excess of 20 years. I can still work some of the original butyl on factory fittings in my hand and it will with a bit of heat from my hands become pliable again.
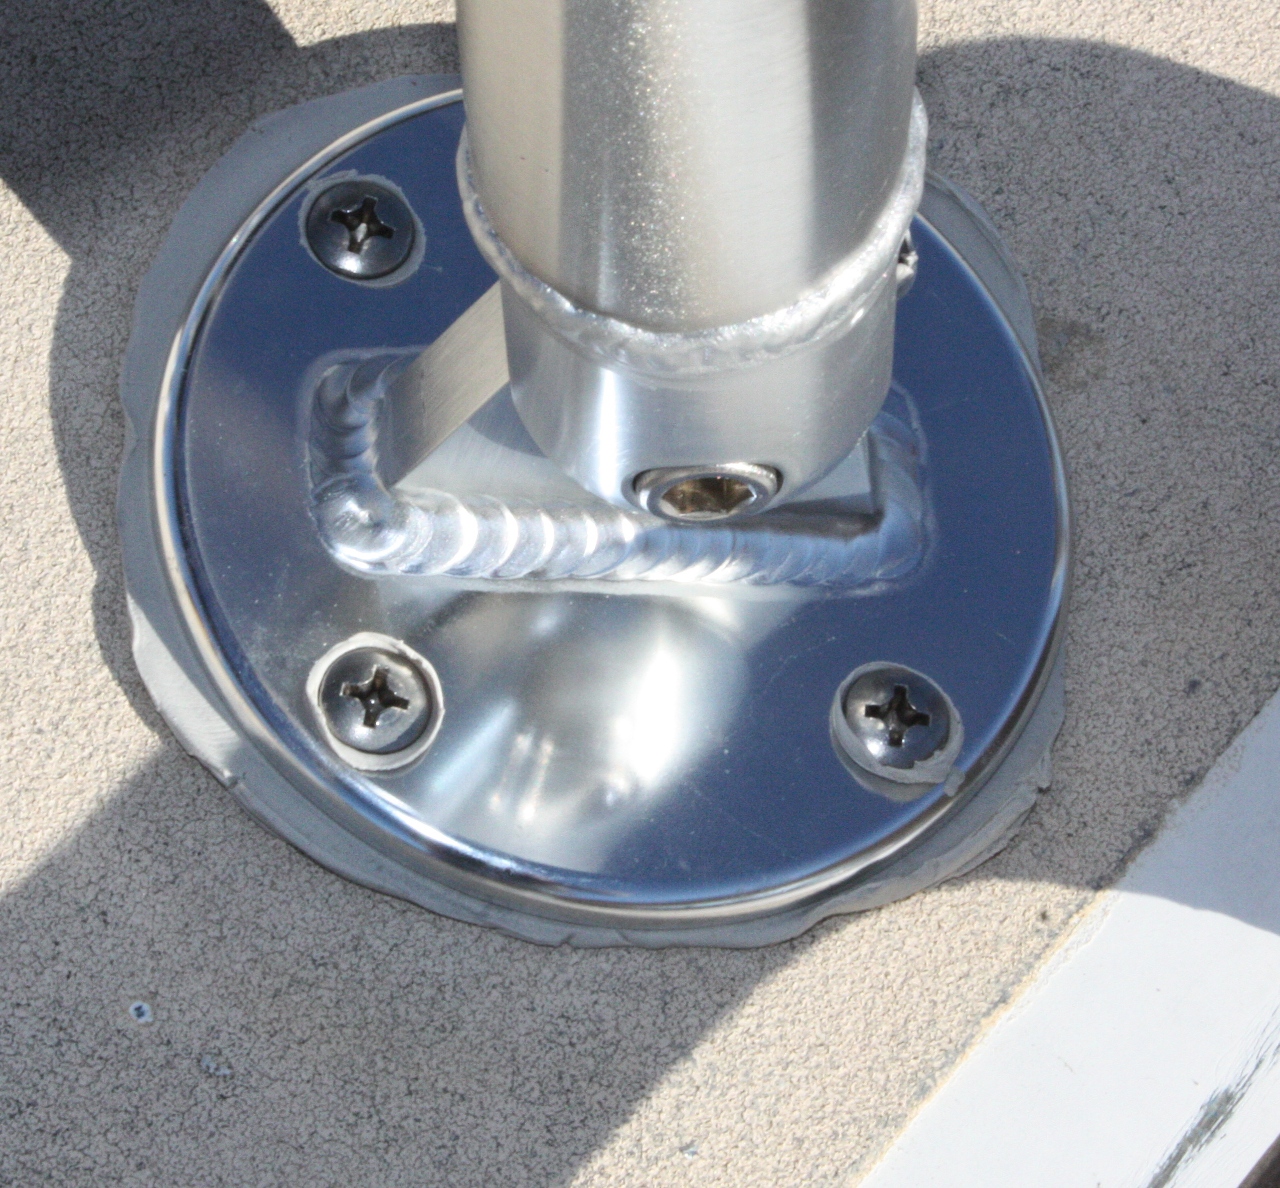
The hard dodger feels incredibly strong and solid with it all bolted in.
 Offline
Beautiful bedding job Scott, and a handsome dodger!
Oh and I'm a bit jealous when I think about boats in places where it doesn't rain every day 🙂
Scott Maxwell
Offline
Thanks Scott,
Last year this time we had average temps in the 20's and 30's during the day and now in january we have had just a few cold days. Most days it seems it gets into the 60's and 70's. Makes you worry about when the other shoe will drop.
I think that your part of the country is absolutely beautiful, but im not sure I would survive constant rain. I would love to visit for a while up on the northern coastline there though. I was looking at the cost of getting valkyr there the other day. Ouch.. the panama canal fee now for small boats is almost 2000 dollars.
So how is Amatheia coming along? I have been so busy with my daughter and life in general that I really haven't been keeping up with members websites and their boats. One day soon I plan on a whole day of scraping up new stories and getting a schedule of posts for the front page going again. I feel kinda bad that the site has been sitting static for so long.
Offline
Hey Scott,
All is well, Amatheia had a fun summer and fall last, sailing north from the Columbia River and cruising around the San Juan Islands and the Puget Sound. She is berthed in Olympia, right at the southernmost part of the Sound and just 2 hours north from Portland by car. I'm up there a lot and with spring coming on will do some exploring in that area.
And just as soon as I complained about the rain, presto, it stopped! We have a rare sunny weekend forecast and I took the opportunity to play hooky and take her out for a sail today, just gorgeous with Mt Rainier and the Olympic Mtns all white with snow and gleaming in the sun.
I'm glad that fatherhood is going well for you AND you get to work on the boat too!
Scott M.
Offline
glad to hear you got out. I am just dying to get valkyr away from the dock. I still haven't fixed the fuel tank 🙁 I think I'm going to plumb in a portable tank till I fix the main one. 🙂
scott
Offline
Thanks for posting all the pics. They are great.
Now if you'd just lengthen it by about 4 feet you'd have an excellent pilot house project 😀
Offline
lol.. I would love a pilot house version of this boat.. the rare DE41…We actually looked at one online that was for sale and drooled over it,however it was beyond our means.:)
We are planning on taking the old stainless dodger frame and mounting it to the aft pulpit at teh sides so that it goes over the pilots seat. All we need then is to put a canvas cover on it and connect that to the aft end of the dodger 🙂 sorta pilothouse.
Scott
Offline
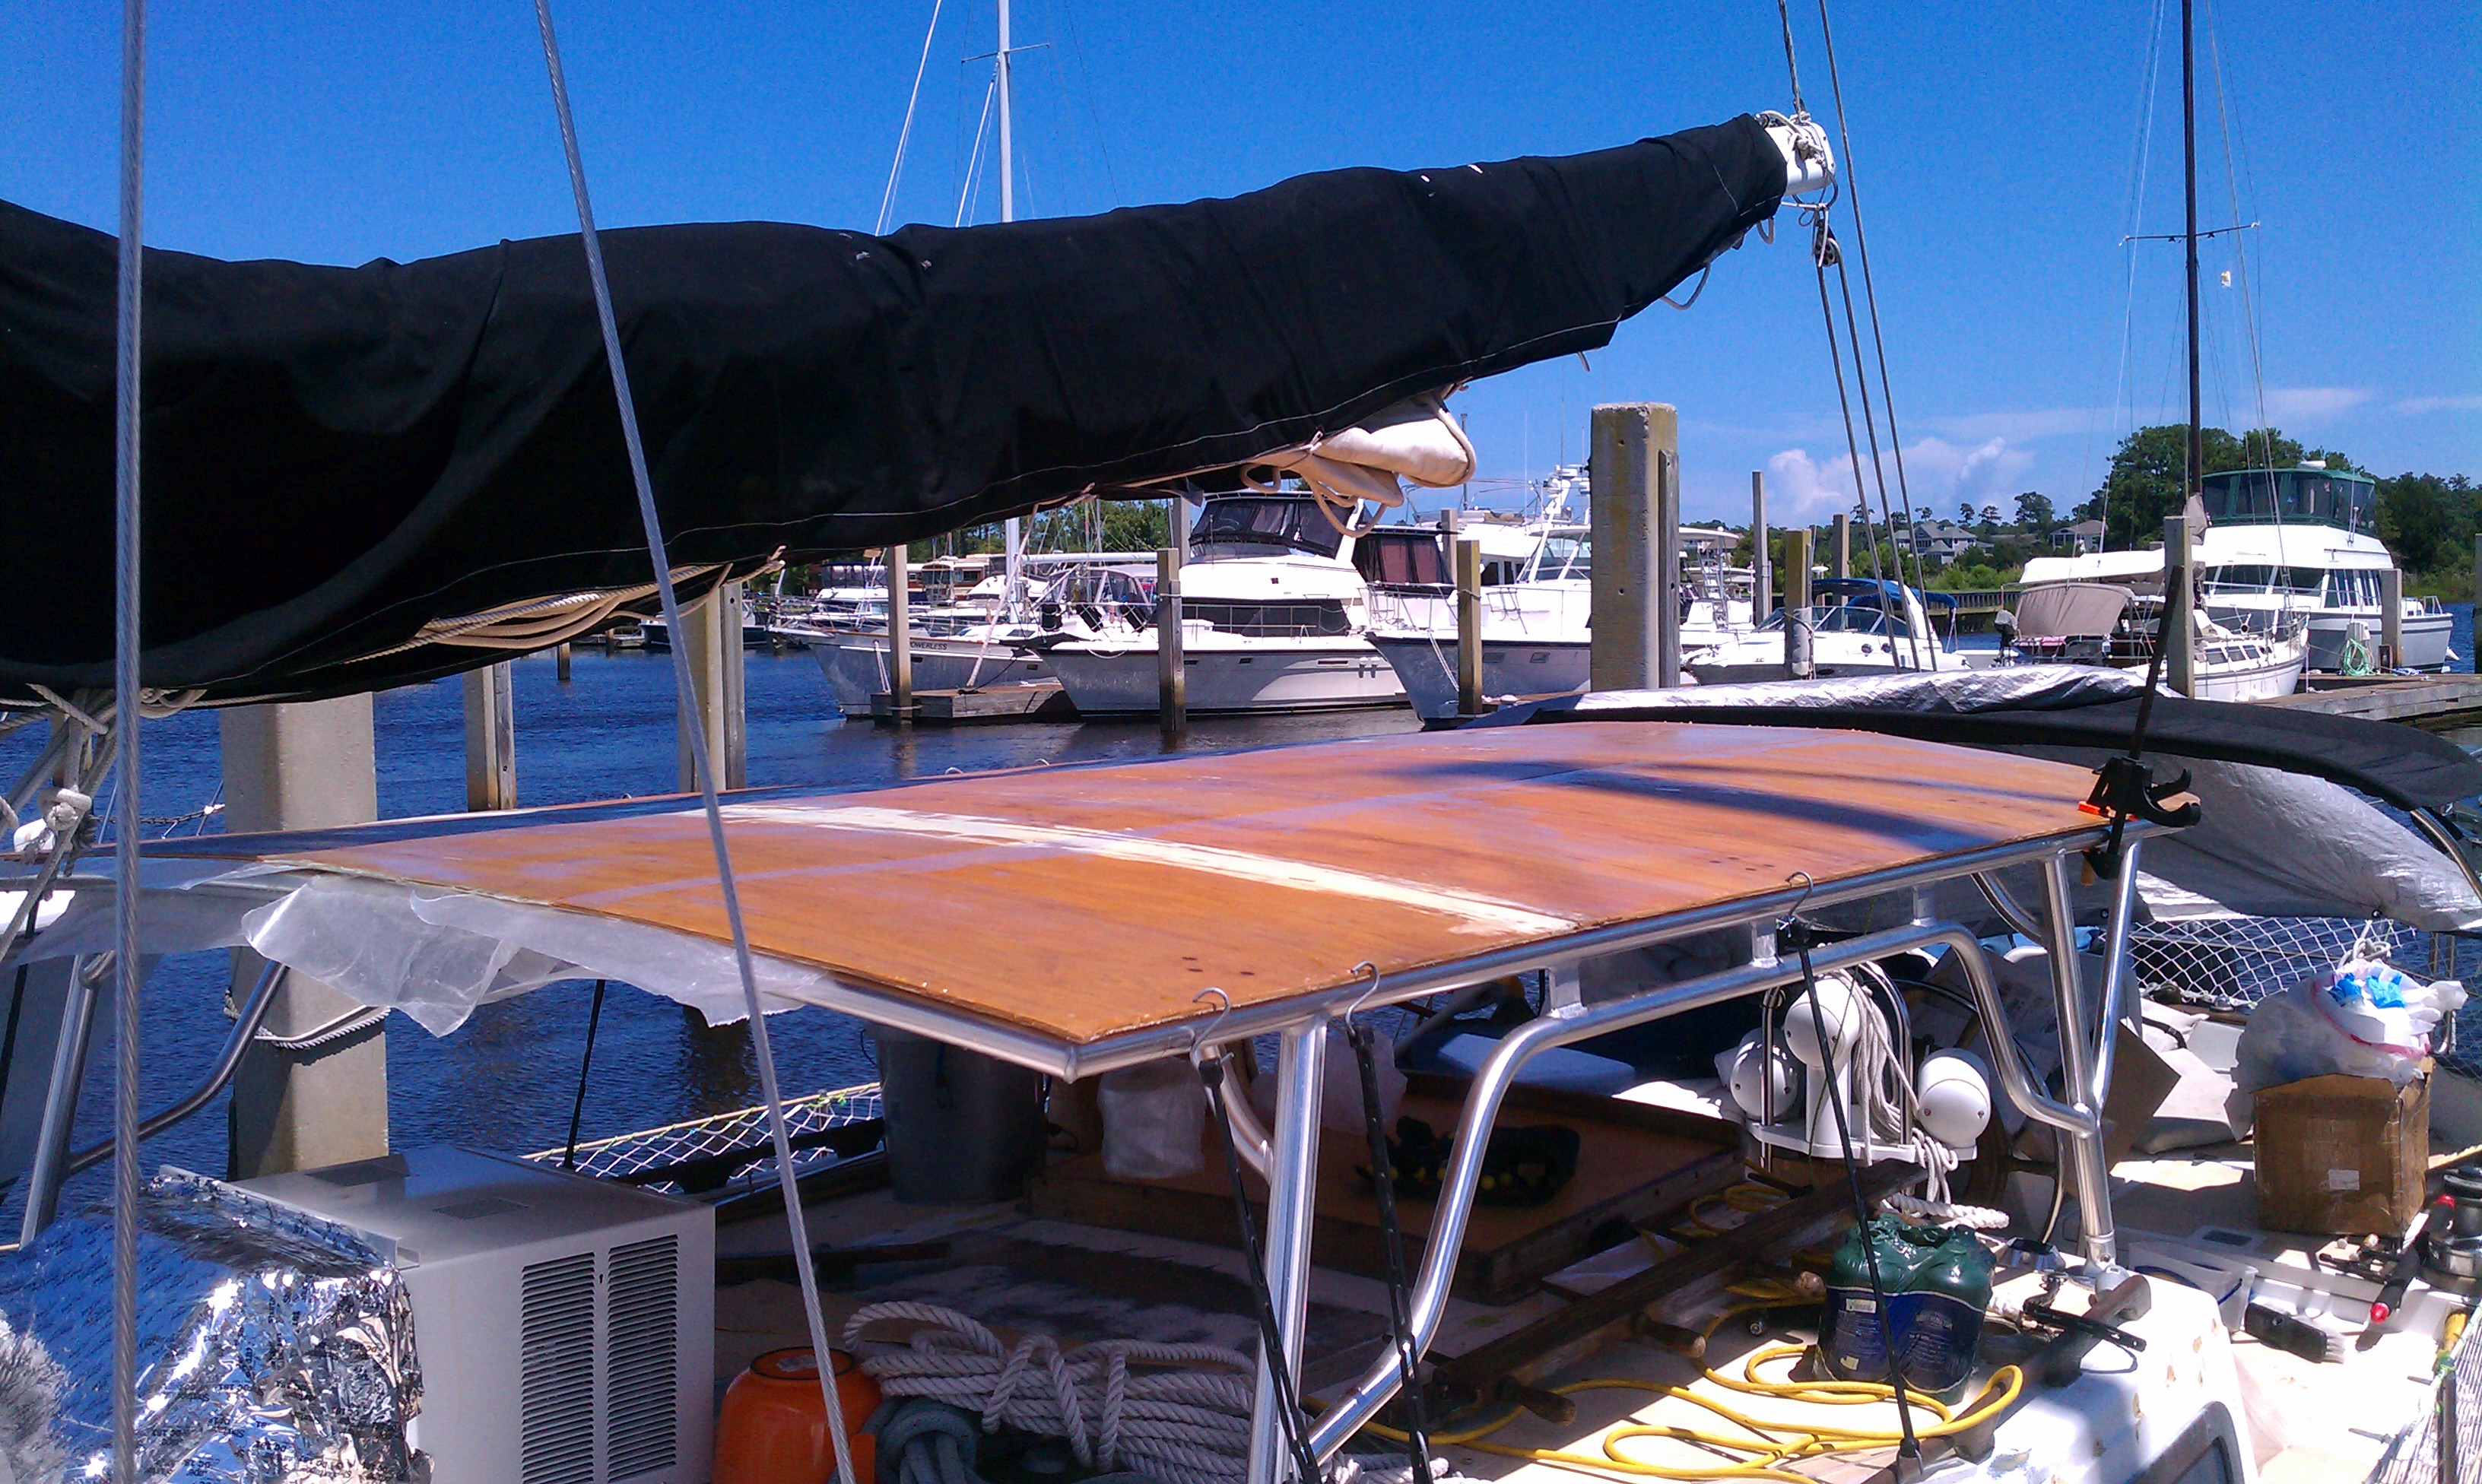
So the hard dodger project moves forward. I scarfed 3 4x8 sheets of luan together to get a single piece of plywood 5.2 mm thick for the roof of the hard dodger. Once I bolted it down I used a router to trim it to the shape and size of the dodger frame. This happened a month or so ago and then I got busy again and it wasn't till this week that I got out and started applying fiberglass to the top and bottom. I used 9 ounce fiberglass cloth on the top and bottom of the ply. It took 4 pieces 60 inchs wide by the 9 ft length of the top of the dodger. I over lapped the edges in the center by about 30 inches to give a highly reinforced strip up the center of the roof that should be walkable 🙂 18 ounces of fiberglass and epoxy both top and bottom. It should be noted that I scarfed the wood together in place on top of the framework and then fiberglassed the top, flipped the whole thing over and glassed the bottom and then flipped it back right side up. It was interesting to say the least. I was also working most of the time in a 5 to 10 knots of breeze and trying to keep the fiberglass laying flat as I worked the resin into it.
Here is a picture of the last corner of the bottom to be glassed and you can see the wind catching the cloth and flipping it up. 🙂 inspite of the not ideal conditions I think it came out great. I'm very happy with it, especially as it is the first fiberglassing project I have undertaken like this. I have done real small repairs before but no large scale construction projects.

the finished bottom. you can see the slightly wavy line down the length of the roof that is where the two pieces of cloth overlap. I did my best to keep a straight line there but on a single piece of fiberglass 9 feet long that proved much more difficult than I anticipated. I used a squeegee to work the epoxy into the cloth and it would pull at the fabric as I did so. The whole top so far, both top and bottom has consumed about 1.7 gallons of epoxy I think. I have a 3 gallon kit of 2:1 epoxy and have used a little more than half so far. Where the bottom is so glossy is where I went pack and used a paint brush to fill in the weave of the already applied cloth and epoxy. The initial application of epoxy to the cloth was just enough to wet it out and leave no dry spots while using no extra. It left the weave of the cloth visible on the surface. After it tacked up and wasn't going anywhere I went back and filled in the weave to give a smooth surface. I haven't done this on the top yet as I still need to epoxy in solar panel mount rails and a lip around the whole top. After that is all done I will go back and paint it all with a layer of epoxy to fill the weave and then paint it all white.

we waited about 4 hours for the resin to dry enough that it was no longer tacky and then flipped the roof right side up and put it back in position.
You will notice just behind the dodger a small bimini. This as last weeks project. We recycled the old dodger framework into a small bimini. I think it is going to work out very well. We made the fabric part out of a solution dyed polyester fabric called Top Notch.
The stuff hanging out between the front of the top and the framework is just some wax paper. Once we flipped it over we found out that there was a section just in the center that was still tacky and we wanted it to not stick to the framework.
The top at this point is starting to stiffen up significantly. I think that it will be strong enough to walk on for sure. If not I have some more glass and the rails for mounting the solar panels should make it much stronger also.
Don't mind the mess 🙂 I have tools everywhere, sanders, chisels, drills, extension cords, etc... Ah the joys of doing major projects on a boat. Did I mention that we have been living on the boat while all this has been going on. 🙂 at least it is an outside project and hasn't bled into the interior of the boat. Other than a few drips of epoxy it has been a very clean project with little waste. I think I have wasted about a cup and a half of epoxy if you add up all the remanents of resin that have hardened in the mixing containers and maybe two square feet of cloth that has been the overhanging part we trimmed off.
Oh I found the secret to trimming the cloth is to take a sharp knife and just trim it off against the edge of the plywood once the resin gets hard but still a little pliable. don't let it get totally hard as it is almost impossible to trim off then unless you sand it down. So far I have totally avoided sanding epoxy or the fiberglass. 🙂 I know it can't continue but I have been really patient and meticulous trying to get it right the first time and not have to redo any of it.
I have to go get the solar panels tomorrow so that I can figure out where on the roof they will go so I can fabricate mounting rails out of wood and fiberglass.
Until next time 🙂
Offline
I should have known that everything was going to smoothly. I brought the solar panels I purchased a couple years ago and went to place them on the hard dodger and they are about 2 inches to wide to fit between the handrails. 🙁 what a bummer. So we now have two 205 watt solar panels for sale. 🙂 2 dollars a watt and the have a new home. I am now researching new panels that will fit in the actuall space on the dodger. Not sure how that slipped by us when we were designing it as holding the panels was one of the major reasons we built it. They do fit at the forward end but the aft end doesn't as the dodger follows the lines of the coach roof and gets narrower at the rear. I am now looking at the semi flexible panels that weight less and are only 2.5 mm thick. You can walk on them also.
live and learn.
Offline
Amazing, you were able to do all this work on the dock?
If you could post pics of your receipts showing all the supplies you used it would be great.
Offline
When I get a chance I would be glad to. I think I spent about 80 dollars on plywood from lowes. 5.2 mm luan underlayment. You need to be careful as sometimes it is good stuff and sometimes it is fairly low quality. Obviously its not as good as actually marine grade.
10 dollars for some 5 minute epoxy to glue the sheets together once they were scarfed.
7 dollars for 2 8ft 2x2s that I screwed the plyto on the scarfs to hold them together and keep them tight while the glue set.
I used about 15 dollars worth of CPES penetrating epoxy on the top surface of the wood on the dodger to seal it. The two gallon kit was about 130 dollars or something like that.
The supplies from Raka were in the neighboorhood of 260 or so? enough 9 oz fiberglass to cover top and bottom and a 3 gallon epoxy kit. Also mixing cups, stirring sticks and plastic expoxy spreaders to squeegee the epoxy into the fiberglass.
so far that puts me at about about 360..
the new solar panels I just ordered will be 350 more for 350 watts of thin film panels that will be glued to the top of the dodger and then laminated over with glass and optically clear resin. This will turn the top of the dodger into a solar panel. The resin and fiberglass for that will run about 150 dollars more for a new total of about 860 dollars for the top of the dodger. 🙂 I got a hell of a deal to get thin film panels for 1 dollar a watt. I actually ordered 500 watts of them. I am thinking about imbedding some into the foredeck when I redo the nonskid.
I'm sure it is more. I used 30 1/4 inch stainless bolts and nuts to secure the top to the frame for another 34 dollars. Misc sand paper, brushes, etc... I still have to paint it white after all else is done and still have to fiberglass in a raised lip all around with drains at the corners. Not to mention the wire, soldering wire, and buss bars to tie 9 25 watt thin film solar panels together and run the current to the charge controller under the pilot berth.
This dodger has become much more expensive than I initially thought it would. 🙁 Not that it is particuallarly expensive. It is actually a very good deal for what I am getting.) mostly because I sucked at estimating what it would cost to do what I wanted. I will have probably 3500 in everything by the time its done. Frame/top/solar/ etc... I still have to wire in some led lights both red and white, as well as sirius/xm antenna, usb gps antenna that runs to computer at chart table and other enhancements. mounts at forward end for redundant oil running lights and mount for brass ships bell if needed.
lol I also forgot we plan on running isinglass/bug screen all the way around it.
Offline
My soft dodger cooks the cockpit to about +10 degrees over ambient on a very sunny day (it's blue sunbrella), so I'm wondering if you've considered insulating the underside of your dodger.
Offline
Hmm I hadn't. However it would be really easy to do.. Just glue a layer of reflectix to the under side. With the dark solar panels glued to the top though I don't want to insulate the bottom 🙂 I need it to cool off the best it can. I guess I will just have to see how it does. Right now with just the clear epoxy and glass on the top so that it is the brown of the wood it doesn't seem to get hot underneath.
Offline
So I test laid out the solar panels today on top of the dodger and was able to fit 13 of them on it. so 13x25=325 watts of capacity on the dodger top. Then I am going to install one of the older 190 watt panels I bought over the dingy davits for a total on boat wattage of 515 watts. We are talking about embeding the other 125 watts of 25 watt panels into the deck forward.. not sure if that will happen though. Possibly we could install them on top of the bimini by sewing them to the fabric or maybe snapping them to it.
Offline
An interesting side note to using luan/underlayment from home depot/lowes. I had an offcut from before I treated it with epoxy to seal it laying around on deck. It has been out in the weather for months now and hasn't delaminated or warped at all. I think that sometimes they get in lots of this stuff that is mostly marine grade but it's not a sure thing. A lot of what I looked at was obviously cheap crap. The stuff I bought actually looked as if it was higher quality with what looked like 5 lamination's and no edge voids. It also just felt more quality to the touch. The store had no clue as to the provenance of the wood and didn't seem to even know how to find out. So it was a leap of faith and a little judgement as to the observed quality of the wood. I'm glad that it seems to be working out. I purchased a 3/4 inch sheet of birch cabinet grade wood at the same time and a piece that I totally sealed the surface with penetrating epoxy before using it in the cockpit has totally delaminated.
Most Users Ever Online: 175
Currently Online:
4 Guest(s)
Currently Browsing this Page:
1 Guest(s)

Top Posters:
Jonathan Oasis: 177
bobmcd625: 165
CAE: 150
mgav451: 143
Rick: 94
svbodhran: 84
Member Stats:
Guest Posters: 7
Members: 366
Moderators: 1
Admins: 1
Forum Stats:
Groups: 3
Forums: 13
Topics: 747
Posts: 3838
Newest Members:
Tools of the Smith, tonyflor, sailordad46, Spirare, BradHartliep, DuncanModerators: Patrick Twohig: 134
Administrators: Scott Carle: 1481
