 Topic RSS
 Offline
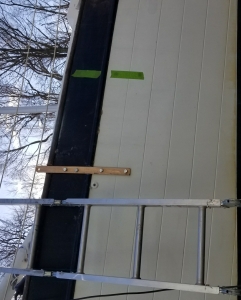
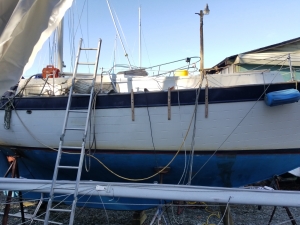
since a lot of owners have done this I need a few pointers if any one has. I have a 77 de 32 cutter with the internal leaking chainplates. My plan is to have port town foundry make me some bronze one to mount externally. I have a few questions. There’s the little ridge or lip where the rub rail is outside on the hull. ( don’t know how else to describe it, its where the stripe is) do I just grind it flat or do I have the plates made to go around and over that? Also when I remove the old ones I will be using them as backing plates on the inside. Is this how every one has done this? I can use the internal plates as a pattern to send out and have. New ones duplicated in bronze. Any pointers?
I would not design external plates to go around the lip. I would grind that down. You don't want to introduce any stress points in the chain plates because of a changing profile right where the plate bends slightly already as it changes in plane from up the hull to in line with the angle of the shrouds. Probably not a huge issue in weakening a thick piece of bronze anyway but we know that angles, corners and zones where the profile of metal changes and is under cyclic stresses are breading zones for developing cracks. I would make sure that the chain plate comes up the hull flush against it all the way to the very top edge of the fiberglass. Then your angle change to be in line with the shrouds. The cap rail simply needs to be cut out so that the chain plate doesn't touch it on that edge.
Scott
 Offline
Sounds good. I assume the old chainplates will conform to the hull and can be used as the old ones. .I'm gonna need some pointers on this compression post to. I think they must have been drunk when they designed that. What a bad design that is. It's not even under the mast and it's not inline with the landing under it. Where it ties into the shower pan/ head step is all crushed and it's not even resting on the lower post in the bilge area. IM thinking I'm gonna cut a 4x4 hole in the deck right over the current wooden post then cut a 4x4 hole through the head step/ shower pan area. Pull out what they thought was a compression post. Put a piece of g10 in the bilge area then slide a 4x4 stainless box beam to rest on that and cantilever the top fwd to rest under the mast. Still trying to figure out how to tie the bulkhead and shower pan etc into this to make it look good.
You will just need to cut off the top of the old chain plates where they bend in.. no use for that part and it would extend up through the cap rail from inside. 🙂
My compression post and above and below seem to be in good shape with no deformation at deck or below the sole so I have never taken it apart. would not have thought it was out of line like your describing. There area few posts on this topic and maybe some stuff on the main website. Do a good search for compression post and see what turns up. I'm pretty sure there are some pictures of stock and upgraded versions/projects for you to look at. I'm having trouble believing that yours is stock if it isn't inline with the mast and the footing in the bilge under the sole. I would say the stock setup could have been better designed based on a lot of people having to repair theirs but based on it taking 20 to 30+ years for most of them to start having issues and never having heard of a failure in use of one then maybe they were well engineered to be safe for the boat but not for lasting forever. There are a lot of areas in these boats that are like that. Actually almost all boats are like that. I can see where if you built every thing to be maintenance free forever that the cost would go through the roof.. 🙂 kinda what owners are for. To go behind the engineers and rebuilt it to last forever 🙂
 Offline
Moved chain plates to the outside of hull about 12 yrs ago. Used the same chain plates, but polished and inspected very carefully. Had to replace two of them due to cracks in stainless. Used most of the same bolts and original nuts, but did change some of them. No need for backing plates, as the hull has been reinforced in this area and there was no sign of deformation of holes in hull. Used the old chain plates as a pattern for making the new ones. Have fun making the square holes. Used as small square file. Wasn't that big of a deal. Angle of bend was duplicated using a big vice. Slight adjustments in angle are taken up buy standing rigging. Used an angle grinder on outside of the hull to make the chain plate lay flat against the hull. All and all a very easy job which stopped those pesky deck leaks.
Cheers and beers,
Jim
 Offline
 Offline
 Offline
 Offline
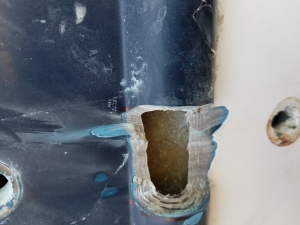
It looks as if it is a hollow fiberglass tube where you cut into it. Is that correct? hole doesn't go all the way into the inside of boat?
If so then I would think just make some epoxy bog and use a little glass to fill it in and shape it to be flat at the external hull level and shape the protruding part on either side to look nice. I don't think you would have lost a huge amount of structural strength. Maybe backfill the hollow inside of tube for a few inches on either side with glass and epoxy to give it rigidity right there.
Scott
 Offline
Yes that's the plan however I have the hull liner in there so I can't really get at it. Plus it's up in the toe rail nomans land there where you need a contortionist to get hands into. Should be ok. I used 3/8 bronze for the plates drills so easy and bends so easy. Hope the holes don't elongate. I didn't use cast bronze as you should but I hope it's gonna hold just as good. Im not sure the difference between the 2.These really are nice looking boats! I got painting and cosmetics to do but with this compression post and chain plates she should be ready for a beating! I did notice the pics of others chain plates there's 5 bolts as opposed to 4 mine are 24 iinches long 1&1/2 wideand 3/8 thick same as the old SS ones just 3/8 rather then a 1/4 inch. Think I'm ok? I've got the mast down holy hell that thing is like a telephone pole very roubust which makes me happy. I guess the cutter rig allows for smaller standing rigging? I've got 7/16 pins on the stays and shrouds and 1/2 on the fore and aft. Seemed a little on the small side from what I'm used to seeing.
 Offline
mgav451 said
I used 3/8 bronze for the plates drills so easy and bends so easy. Hope the holes don't elongate. I didn't use cast bronze as you should but I hope it's gonna hold just as good. Im not sure the difference between the 2.
You really need to know what the tensile strength of your bronze is and that it is suitable to the loads your going to be carrying on it. I love good bronze. maybe a Silicon Bronze etc.. 3/8 sounds pretty good thickness of the top of my head but it's been a while since I did those numbers. This is an area you don't skimp in and make sure it is the right type of bronze and the right thickness. As to elongation of theholes.. only three reasons that should happen.
1. it is a softer bronze that deforms.
2.& 3. the holes are not perfectly round and exactly the diameter of the pins. The pins should fit snugly and the tension on the holes should be inline with the length of the chain plate. If it is pulling unevenly on the pin or the hole and pin don't fit snugly, over time the movement and tension will wallow the hole out and you will get more and more movement till something gives.
 Offline
Looks like difference in rub rail is one of the differences between a DE32 and DE38. Not a big deal. If you are going to change your standing rigging, a few tips that saved me $1000. There is a firm in Connecticut that sells 1x19wire made of Nitronic 50 stainless. A good upgrade for little money. I used the same thickness of wire as the fore stay, for all of the rigging. I ordered the connectors (Stay lock) from a mail order house in England for a substantial discount to US prices. Pick up a British magazine to get phone numbers etc. Worth a look. To cut the wire, I used a vice, some masking tape, and a 32 tooth hacksaw blade. Easy peasy.
Cheers and beers,
Jim
I did the same thing when doing my rigging.. moved up everything from 1/4 inch to the same size as the upper shrouds. kept it simple going to all stay lock fittings top and bottom and didn't add but a couple lbs to the weight aloft as it was just the lowers and whisker stays that changed if I remember right. That way I could carry one size of replacement wire and spare fittings. I think that the bob stay was the only other size and at it was comparatively huge.. just the two fittings for it sucked for cost.
Most Users Ever Online: 120
Currently Online:
3 Guest(s)
Currently Browsing this Page:
1 Guest(s)
Top Posters:
Jonathan Oasis: 174
bobmcd625: 165
CAE: 150
mgav451: 143
Rick: 94
svbodhran: 84
Member Stats:
Guest Posters: 7
Members: 366
Moderators: 1
Admins: 1
Forum Stats:
Groups: 3
Forums: 13
Topics: 745
Posts: 3834
Newest Members:
tonyflor, sailordad46, Spirare, BradHartliep, Duncan, MistyDawnModerators: Patrick Twohig: 134
Administrators: Scott Carle: 1480
 Log In
 Register
 Home
Home


