 Log In
 Register
 Home
Home

 Topic RSS

 Offline


We're getting ready to install new sheet travelers for the mizzen and main and rewire the interior so the saggy upholstered headliner with the cat scratches from the previous owner is going away.
I'm also replacing the ports: two big ones over the galley and nav station and the rest of the small ports which are plastic and breaking and leaking.
That said, I want to insulate and install PVC beadboard. It appears that 3/4"Polyisocyanurate insulation board is the best bet for best R value in that thickness. The combination of the 3/4" board and the 3/8" beadboard (which should be indestructible) and the 3/4" cabin thickness would give me a total of 2 1/4" from outside of cabin to inside of beadboard. Anyone want to tell me this is a crazy idea, I don't need insulation, I'll get claustrophobic from the diminished cabin volume? Has anyone had success with a different insulation? Is there something about the concept that won't?
I have help so all those of you who are thinking this is a 20 year project, it's not. I'm doing what I can: safety and comfort, and hitting the ICW next May.
Thanks!
Rick
Orion


 Offline
I would think that you would have more insulation with that setup than you did with the stock vinyl .... Sounds good to me but a lot of work 🙂
Offline
Actually Our idea is even more work.. we are planning to build drop down storage compartments where the head liner is now.. very shallow large tray sort of things .. We were planning to glue a single layer of reflectix above them to the overhead for insulation.
Offline
Rick said:
We're getting ready to install new sheet travelers for the mizzen and main and rewire the interior so the saggy upholstered headliner with the cat scratches from the previous owner is going away.
I'm also replacing the ports: two big ones over the galley and nav station and the rest of the small ports which are plastic and breaking and leaking.
That said, I want to insulate and install PVC beadboard. It appears that 3/4"Polyisocyanurate insulation board is the best bet for best R value in that thickness. The combination of the 3/4" board and the 3/8" beadboard (which should be indestructible) and the 3/4" cabin thickness would give me a total of 2 1/4" from outside of cabin to inside of beadboard. Anyone want to tell me this is a crazy idea, I don't need insulation, I'll get claustrophobic from the diminished cabin volume? Has anyone had success with a different insulation? Is there something about the concept that won't?
I have help so all those of you who are thinking this is a 20 year project, it's not. I'm doing what I can: safety and comfort, and hitting the ICW next May.
Thanks!
Rick
Orion
We're in the midst of our headliner replacement project too...which I must warn you is a WHOLE CAN OF WORMS once you peel the first piece of naugahyde off. You'll see all the leaks you'll have to fix. Forget about trying to save any of it.
One of the better sites I saw documenting a headliner/cabin interior replacement was John Stones blog http://www.farreachvoyages.com.....rhead.html. I've used it as a starting point for our project. So far I have 1/2" Marine Mahogany glued up to the cabin-sides and varnished...ports hopefully installed this week and finished bamboo planking in the overhead after that. It's a lot of work.
If you're planning to get new ports you may be hard pressed to find any made for 2.25" thickness unless money is no object. I think reflectix underneath overhead planking and underneath the side decks would be plenty insulation for cold and hot climates - no need to insulate the cabin sides.
"The only thing that works on an old sailboat....is the owner!"
Offline
Once I'd stripped out all the headliner and yanked all the staples , I decided to just paint the bare fiberglass white and look for leaks over the winter. Well , I've gotten so used to it that I doubt I'll put anything over it now. But u live where it's never below 55 degrees or hardly ever.
I have thought about some kind of wood cieling, but have yet to hear of something simple enoug for my tastes.
 Offline

In my opinion, Reflectix is not sufficient insulation and I live in a rather warm climate albeit with cooler waters (southern california). Last Jan & Feb, the v-berth got down to 40 deg F at night and in the mornings, lowest was down to 34 F. That is cold, even in a warm sleeping bag. Not pleasant to sleep in a mummy bag all the time, either. Not pleasant at all to get up to, in the morning, and the cabin stayed roughly that temp until 10am when the sun warmed the deck – that's assuming a clear, sunny day. It was nearly like snow camping. Rainy days were pretty lame. Currently, early Nov, it is getting down to about 55-60 F in the cabin as soon as the sun goes down due to post-sunset wind chill (55F is about the temp of the water, I'd guess). Also, the framing of the installation needs to protect against any draft because Reflectix needs an air space to insulate (it is not supposed to be attached to the real ceiling aka the underside of the deck, it is supposed to be attached to the suspended ceiling), and I think this would be pretty difficult to do. I know some boaters just spray glue on the Reflectix and attach it directly to the underside of the deck but this does not really do much, I think. Reflectix has no insulation properties for conductive loss so attaching it to anything will cripple it's ability to hold heat.
I am about to order Armaflex 1" thick. I was quoted $372 for a box of sticky-back sheet, totaling 72 sq. ft, delivered to the door. I'm not too concerned with a couple hundred bucks if I can keep my nose from feeling like it's going to freeze off. Will see how easily it will bend around all the various corners, at that thickness. Coast Guard rescue boats use this material but with 1.5" thickness and a special non-combustible version which is even more expensive.
Also, beadboard works where it is dry, such as a house, and the cabin of a boat is wet (with condensation, from breath, or from rapid humidity changes, or from simply hanging a wet towel in the head or taking a sailor's shower). If it gets wet and the wetness penetrates, it loses it's R value. And may mold over time? (Which is worse than being cold: breathing in the black stuff.) The only solution which is destined to work in a boat is closed cell foam type.
Offline
By the way, Re: "I'll get claustrophobic from the diminished cabin volume?"
...depends on how tall you are, doesn't it 😀
I have dropped all surfaces in my v-berth by 1.5" already with wood paneling. On my DE32, I notice less headroom and arm-stretch span when sleeping there (sleeping with head at bow) compared to the old vinyl but only because it was so spacious before and the vinyl was soft if I touched it or compressed it - also because of certain activities that happen in a v-berth where suddenly running out of headroom might cause some discomfort ;-D . But I'll get used to it. The space is still better than nearly any other 32' boat I can imagine. I measured this repeatedly, in fact, the vinyl plastic hide-em strips are already 1" to 1.5" down from the fiberglass, because I was worried about reducing space. Verify this by pulling the vinyl back and looking at the color variation on the wood above the door, for example.
The bigger savings of space is to try to follow the curves. It is tempting to make the wood paneling straight across a curve. By following the curve, the space is restored. It means much more time in the woodworking dept. though.
Offline
Scott Carle said:
Actually Our idea is even more work.. we are planning to build drop down storage compartments where the head liner is now.. very shallow large tray sort of things .. We were planning to glue a single layer of reflectix above them to the overhead for insulation.
I think it might be best to avoid this if possible. Even more added weight overhead. I think it would be easier and better for weight distribution to build up from the floor. Then all the heavy items you have, can be put "underneath the false base boards" - like cans, jars, etc. Then, use the overhead space for quick-grab light but bulky stuff, like jackets or extra blankets, using shock cord-type netting attached to parts of the overhead (no added weight, compared to "overhead drawers").
Offline
I don't think there would be a lot of added weight... I was just planning to build them out of luan so really thin and light. just to hold maps, small electrical cables or devices, spices etc... More weight than just the vinyl but less than doing a traditional wood ceiling.. the space in each one would be only about an inch to inch and half so no big things need apply for a home there. I figured it would mostly be glued together with maybe a strip of fiberglass on the inside joints to give decent strength with the whole thing painted with penetrating epoxy for protection for long term rot or water from leaks.. Then varnished over that. I have pulled the vinyl in the galley and over the chart table and will do those two areas before deciding what to do through the rest of the boat. It might be more than I want to do or I might really like it. Who knows... I'm betting I could do the whole thing for only 4 or 500 dollars at the outside as luan is still not that expensive. epoxy, glass and varnish would probably cost more than the luan.
Offline
Oh, I see. That sounds good. I am using tongue and groove wainscotting hard wood planks (4" wide x 3' long? x 1/8" thick), in packed bundles from Lowe's although I am not sure I recommend them, the quality in general is spotty, such as, they have knots and lengths will differ by 1/4" in some planks. $10 per pack, I forget how many sq feet per pack. Then I am epoxying the strips together to make larger panels and cutting the panels to fit the space. These panels are a bit heavy. I didn't like the look of their other option, the plywood panels with "faux wainscot grooves".
Offline
Yeah.. way more work than I want to attempt 🙂 lol... lot of cutting and gluing.. my concept is just going to be a light stain or natural wood color, varnished. Some of the luan panels have one side that is really pretty.
Offline
My original concept was to just screw some furring strips against the sides of the bows under the overhead and then just screw panels of luan against those. firing strips would be about half inch thick, just enough room between the overhead and where the panels screwed to them for one or two layers of reflectix between the panels and the overhead.
Offline
I found a closed cell insulation panel with one reflective side in Home Depot that has an R value of approximately 5 at 3/4" thick. I figure on gluing 3/4" furring strips to the underside of the deck with 4200 or 5200 with spaces to run all the new wiring for the new LED fixtures then attach a vinyl beadboard that I found at Home Depot with removable machine screws screwed into those barrel screws with the wood threads on the outside and machine threads on the inside that allow for multiple removals. That way I can access the underside of the deck with a screwdriver and a couple minutes. The screw heads can be hidden with plastic caps.
I know it's not vintage or proper but I've spent countless weeks varnishing and annual upkeep on the beautiful teak I've had on various boats over the years but now plan to spend that time sailing and not maintaining. The beadboard is vinyl which should be impervious to mold, mildew, dampness, etc and the insulation should help with the blazing summer sun here in the tropics and the odd cold front if we're lucky enough to get to New England next spring.
NFM has stock ports with a 2" "spigot" that I can accommodate with the same foam panels in 1/2" which will also provide some protection from the summer sun. I'm thinking flat panels on the cabin sides as beadboard everywhere might be a little overwhelming. When we bought the boat all the ports had pieces of foam cut to fit into the ports including the large windows in the saloon so I'm assuming that the cabin gets uncomfortably hot and anything will help.
And yes, everything will follow the original curve of the ceiling and sides otherwise it starts looking like your living room. It's all in the details.
Offline
Sounds good… as to the ports and insulating them.. we have done two different things both of which worked. In combination they worked really well… first was to cut out inserts out of reflectix that were about 1/32 larger than the actually port opening. They would go on the outside of the port but inside the screening. Open port from inside and push them into place and then close port again. Second and maybe even more effective in that you still get light and limited visibility through them was just getting one of the window film kits at lowes/home depot and putting the film on all the windows and ports as well as the forward hatch and midship hatch. The double sided tape goes on the port/window frames and you stick film over that. take a hair drier to it and your good to go.. trim excess off. Also sometimes you needed to clean with acetone before using tape to get a good stick. That made an immense difference. We heated the boat in the winter when we were living on board with a little ceramic electric heater and our power bill never went over 65 dollars a month We kept the boat in the low mid 70's as we had our first born living on the boat and she was still a baby.
Offline
Update:
So I've got nearly all of the 3/4" furring strips/cleats glued to the overhead for the new headliner. I started using 3M 5200 but at $14/tube (with Port Supply discount) I opted for some Loctite PL Premium($4.95) to finish the bulk of the job – holds just as well as the 5200.
I've already started taping the Reflectix up in sections so I'm hoping it will supplement the hand-me-down Dickenson Newport heater we happened upon a few weeks ago. My internal thermostat runs hot, so my wife will be the litmus test for how well the Reflectix holds heat.
For the new overhead I scored some thin finished horizontal grain bamboo strip paneling from CaliBamboo. It comes in a 4' x 8' sheet/roll with a thin mesh backing holding the bamboo strips in place. It's marketed as wainscoting/ceiling covering. I'll beef it up on the back with some doorskin strips and gut into 2.5' sections to act as removable panels. A few coats of clear polyurethane should seal it up from moisture. Here's a link: Bamboo Paneling
I'm hoping to have it done and ready for trim in the next few weeks. I'll post some pics.
"The only thing that works on an old sailboat....is the owner!"
Offline
I fixed the link to the paneling... it needed a .html on the end to work.. So I added that and created a link we could click on.. I still need to upgrade everything and see if it will fix the irritating links auto editing.
Offline
The bamboo looks nice. I am completely convinced to paint my new headliner wooden panels bright white. The difference in brightness is dramatic. The DE's have enough nice dark wood that it makes the interiors look too dim and shadowy. Also, I put up some narrow strips of acrylic mirror in the v-berth which also improves brightness quite a bit. Otherwise underneath the side decks is kind of dark and shadowy even with bright LED lights overhead, to my taste anyway.
I wonder about the vinyl beadboard, if it gets warm it might become more bendable, so more fastening points might be a good idea, otherwise it could sag. But I don't really know, just something I heard. It's also a benefit if it can follow curves more easily, rather than being a rigid panel. I think the other reason I shied away from the vinyl beadboard is that in case of fire, it is really bad stuff. Of course if there is a fire on board that is pretty much the worst situation anyway and hope that never happens. Maybe extra smoke detectors for very early prevention would be a good addition if using vinyl.
Offline
we have smoke and carbon monoxide detectors on valkyr as a matter of course. catch a fire early or you won't have boat.. frozen snot (fibrglass) burns like crazy once it catches. You won't be able to stop it with anything less than a fire hose in the first few minutes. If you can get it with a fire extinguisher in the first minute or less you will most likely still have a boat.
I totally agree about the white overhead. I think we are going with a light wood or white stained wood look when we redo ours. If we don't like that I will go to a flat white and see how we like that. If not then I will go to a gloss white. Pretty sure we will end up with a nice gloss white in a oil base paint that you can scrub easily. The flat white would end up as the primer 🙂 I think it would look sharp with the teak trim on the bows on the ceiling breaking it up into sections.
The darker interior is one of the downsides of all the teak. Don't get me wrong I love the look of our teak when it is all cleaned and treated with tung oil. It is so warm and looks like a million dollars. You can't get a boat made this way anymore for less than millions. But it is dark inside and I personally love it light and airy... I haven't done the mirror thing yet but it is in the works. I think maybe cabin sides and selected places on bulkheads.. It's pretty far down the list though.
Offline
I ripped all the headliner out of the main salon on Sunday and instead of pulling 3,885 tiny stainless staples I just yanked all the wood strips off. The DIY little florescent fixtures turned out to be crap when I had to refasten them in place so I ordered LED overhead lights from Alpenglow (Practical Sailors first choice) and a couple bulkhead reading lights since I have everything trashed.
I found a couple old leaks where the water had decomposed the little tack strips but not any actual leaks after a thunder boomer last night. I'll have to get my lovely assistant to work the hose next weekend while I watch for leaks from inside with the flashlight and rebed any culprits. .
I was figuring on 3/4" strips next to each overhead stringer and one down the middle (across the boat) which would be the only place I'll put a fastener. Then 3/4" rigid foam in between. I'm figuring the foam will keep the deck overhead from heating up the salon (remember the sun in the tropics...) and cut down on the howling wind noise when you're trying to sleep that is almost more disconcerting to guests and new sailors than anything else.
The vinyl beadboard is fairly rigid at 1/4" thick so I don't anticipate any drooping in fact I'm assuming the fastener in the center blocking will hold the pieces in place against the outside strips because of the rigidity of the pieces which are abut 10" wide. I want to be able to pull everything down very easily and one fastener in the center of each 10" piece should do that. As with everything, time will tell.
No idea whether wood beadboard would burst into flames before the vinyl melted. Hope I never find out.
Offline
The vinyl would be more flammable than wood bead board I believe. Sounds like you have things in hand.. I don't envy you the work though it should be pretty straight forward there in the salon.
Offline
Progress has been steady, albeit slow as we brave the pitfalls of a "simple headliner job" and everything else that needs fixing in the process. After pulling the old stuff down and pulled staples for days we began with gluing up some cleats to affix the new bamboo panels. We ripped 3/4" marine ply into 1.5" strips and glued them to the FG with PL Premium and screws (until cured). I removed the screws after curing and filled all holes with epoxy - and coated the cleats with epoxy too.


We also installed 1/2" Mahogany ply panels to the cabin sides with 5200. We used a series of clamps fashioned from carriage bolts and 2 x 4s to pull the panels to the cabin curvature thru the port openings and left them secured untill the 5200 had fully cured.

Then, 3 coats of Epifanes clear varnish...the wood really started to sing and match the existing woodwork.

After all that, it was time for all new windows and ports.


Then, I got started on the headliner install. The bamboo comes on a 4' x 8' roll with mesh backing, but it's not quit rigid enough to install as such. I had to cut into sectional panels backed with luan and held in place by battens screwed into the cleats with brass finish screws.

Nice and bright and woody!

I still have to varnish the battens (red oak) but it's nearly done. I'm thinking about making a nice carved conversation piece for the tricky area where the cabin/deck drops a few inches fore of the hatch.Next will be cabin side trim and under-deck ceiling. More pics to come.
"The only thing that works on an old sailboat....is the owner!"
Offline
wow.. very pretty and a lot of work to boot. I bet you are feeling accomplished about now ![]()
Offline
Scott Carle said
wow.. very pretty and a lot of work to boot. I bet you are feeling accomplished about now
Thanks Scott! I'm tired and constantly sore, but we can't be happier with the improvements. I hope to finish up the project this weekend with the dome light trim rings and a hand painted decorative piece for the 4" drop in the cabin top.
Then it's just a matter of installing red oak ply for the side under deck panels and framing everything in with final mahogany trim.
After that, I'll take a break while wifey-pooh does all the canvas work.
i'll post some choice picks of the final headliner install before I drink to many celebratory brews!
"The only thing that works on an old sailboat....is the owner!"
Offline
Very nice work. Inspirational.
Thanks
Offline
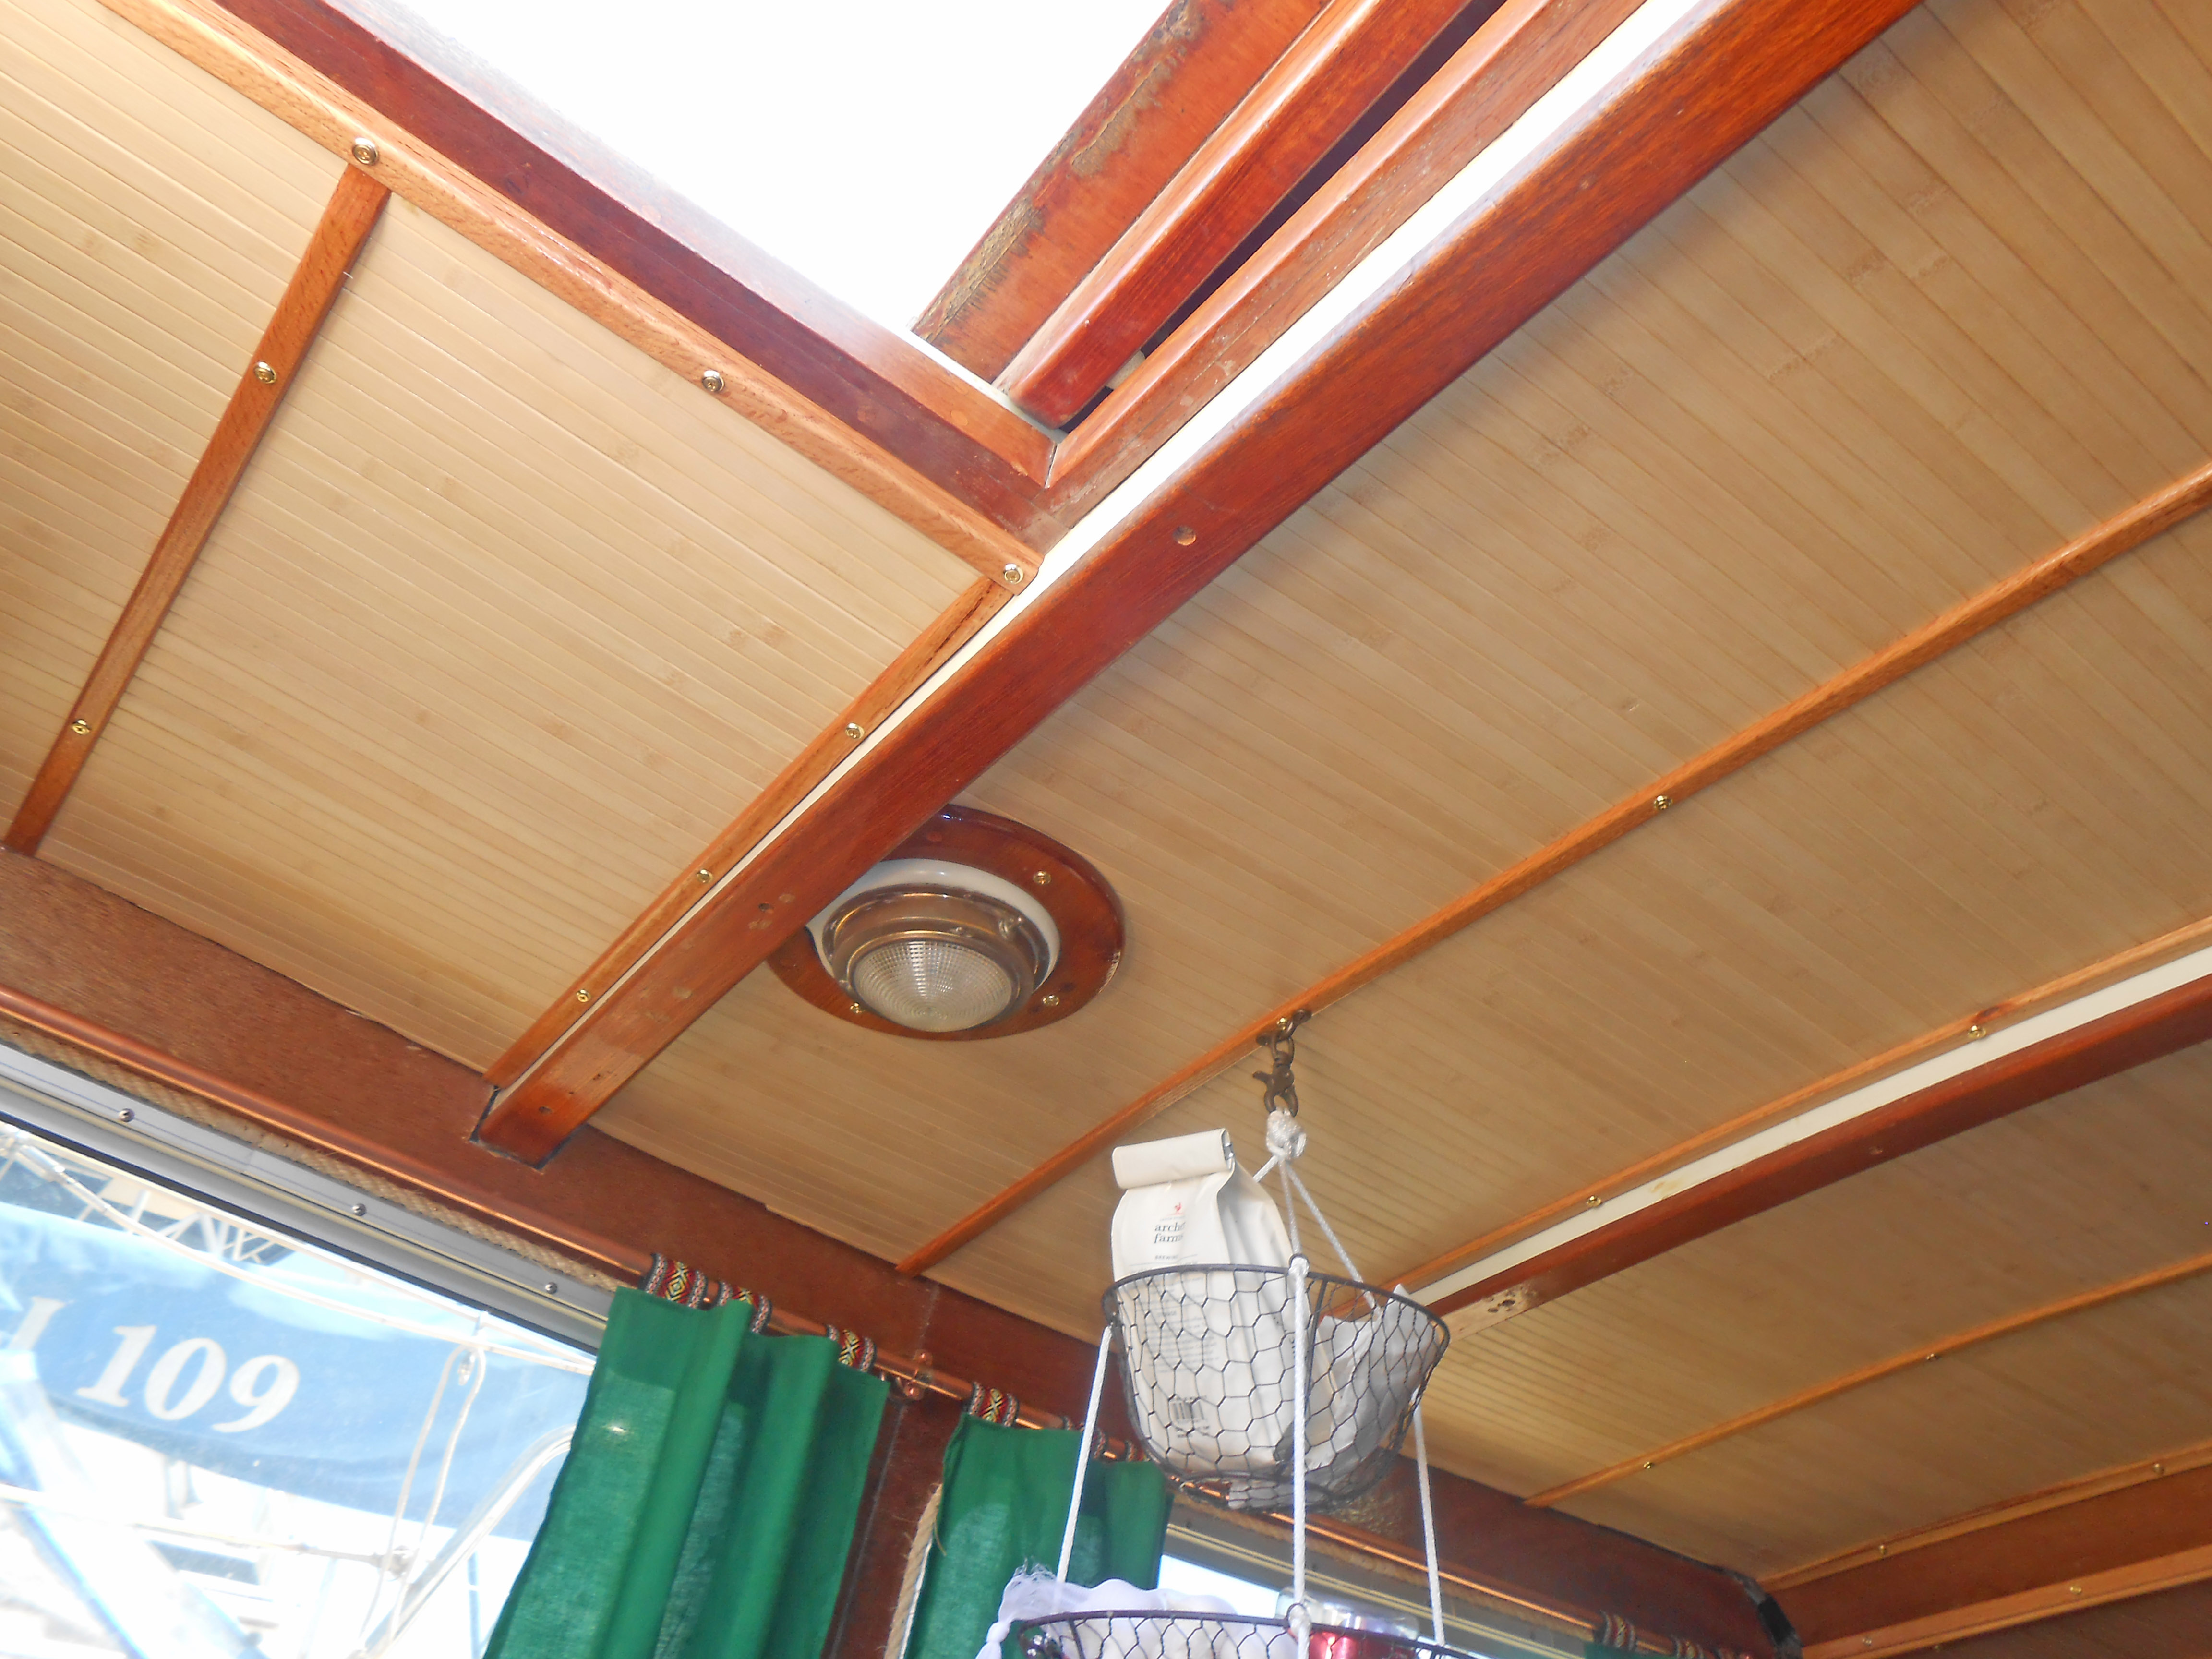
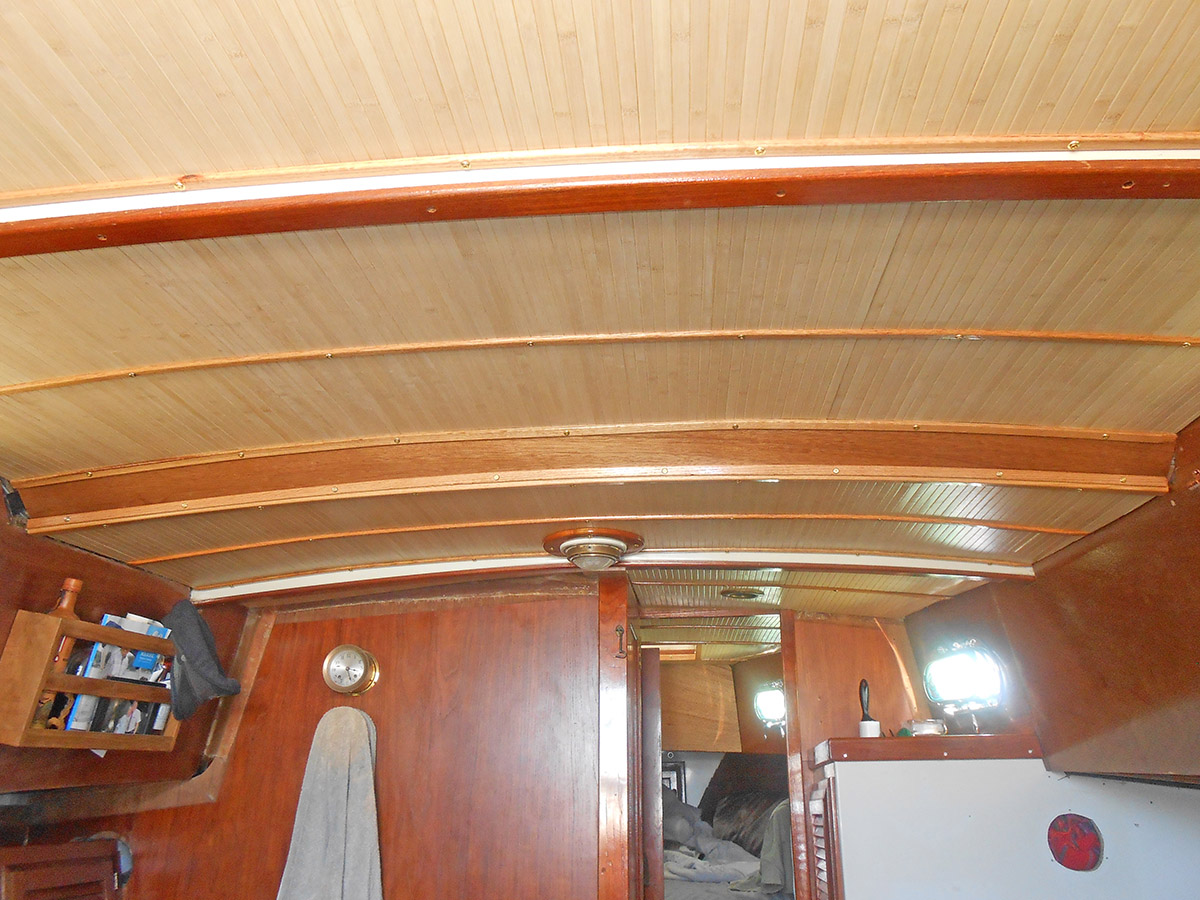
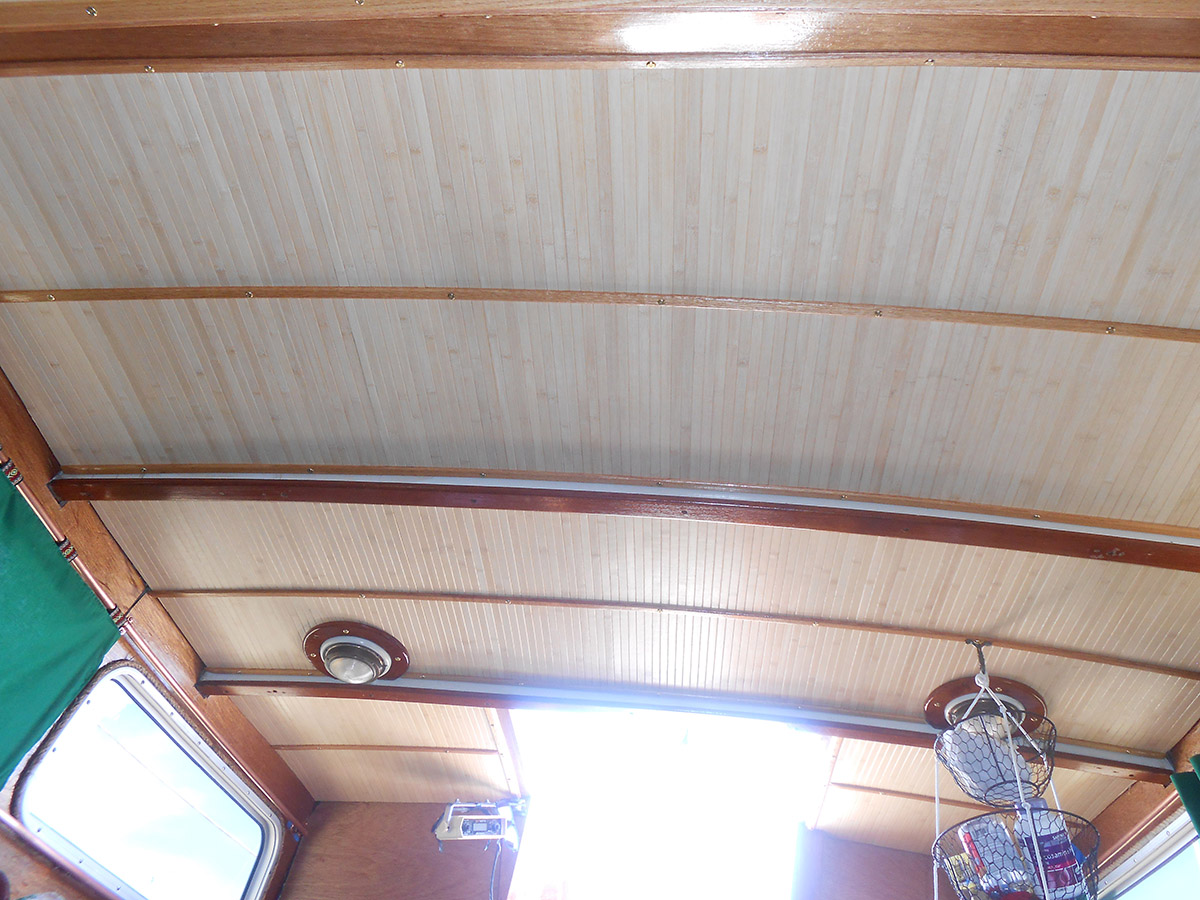
(cue trumpets) The New Headliner is Done! The last piece (where the cabin top drops 4") was tricky but I think it came together nicely:

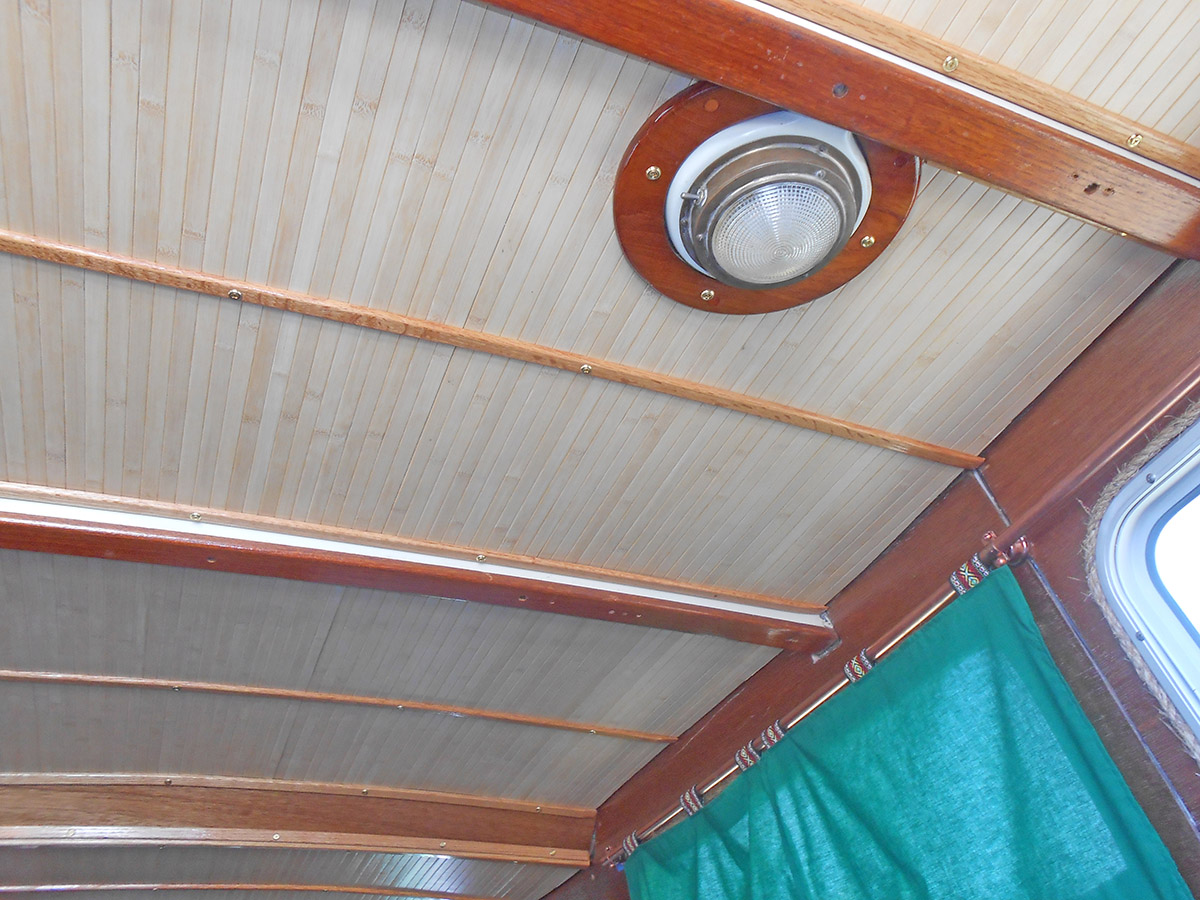
Port side above the galley:
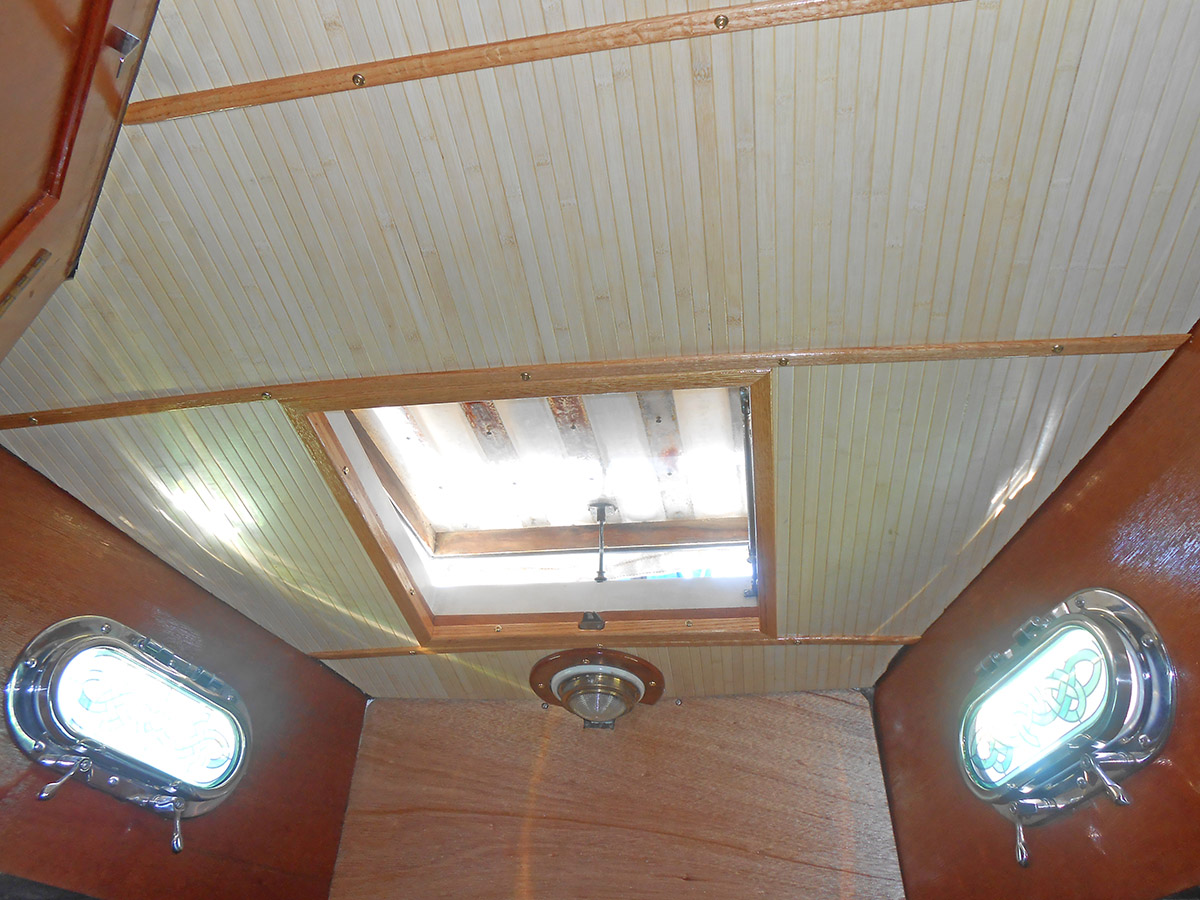
Foward Hatch/V-berth:
Main Salon, Strbrd:
Looking Forward:
Looking Aft:
Head:
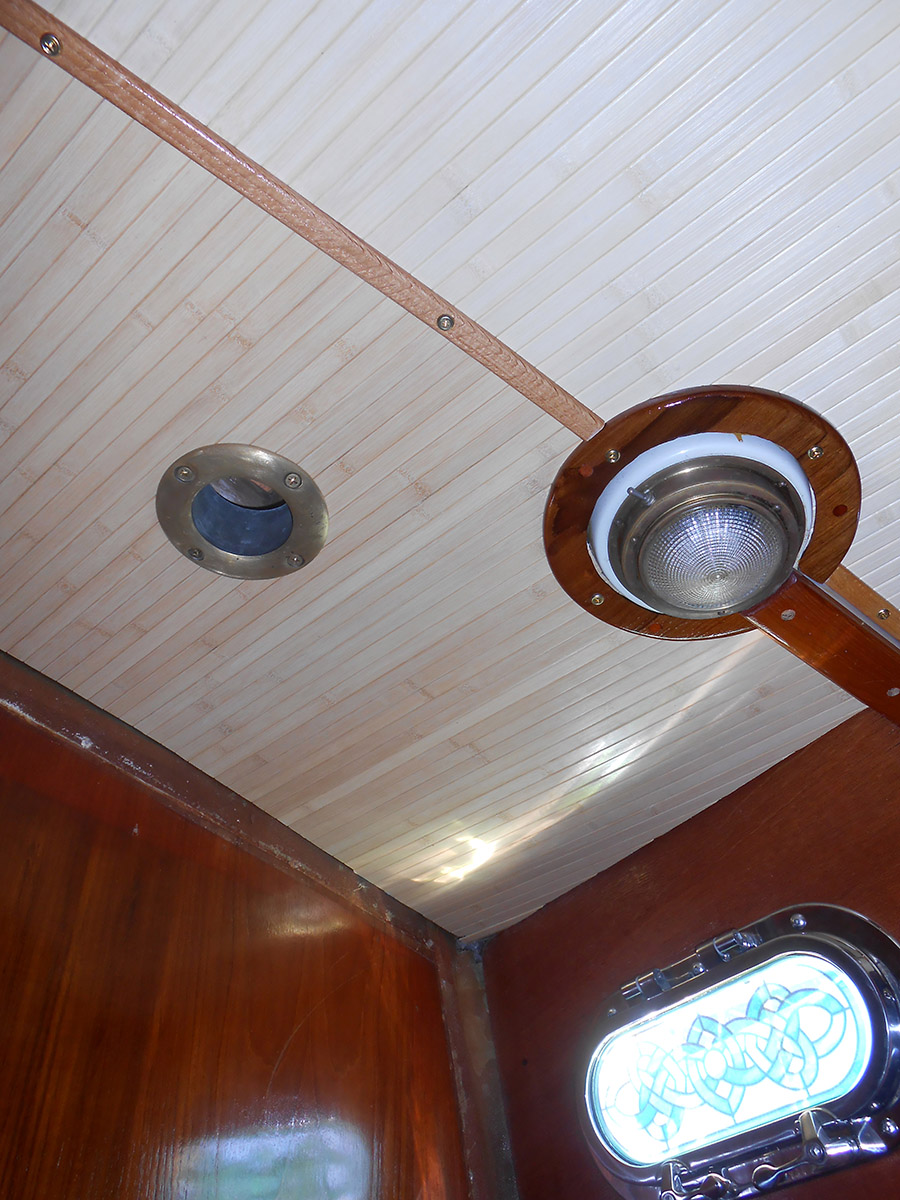
Main Salon Looking up:

I just finished a full write up on the blog for anyone who wants to know more details of the whole process. On to the under deck panels, salon cabinetry and final cabin side moulding/trim.
"The only thing that works on an old sailboat....is the owner!"
Offline
whats your blog again? mabye I can copy your post over to the home page here ?
Offline
Scott Carle said
whats your blog again? mabye I can copy your post over to the home page here ?
Certainly!
https://vivasanpatricio.wordpress.com/2015/04/27/reinventing-the-headliner/
Thanks Scott
"The only thing that works on an old sailboat....is the owner!"
Offline
I had the rare spare moment to actually get this done this morning. Check out the home page and let me know what you think. If you want it updated or changed just let me know.
Scott
Most Users Ever Online: 175
Currently Online:
4 Guest(s)
Currently Browsing this Page:
1 Guest(s)

Top Posters:
Jonathan Oasis: 177
bobmcd625: 165
CAE: 150
mgav451: 143
Rick: 94
svbodhran: 84
Member Stats:
Guest Posters: 7
Members: 366
Moderators: 1
Admins: 1
Forum Stats:
Groups: 3
Forums: 13
Topics: 747
Posts: 3838
Newest Members:
Tools of the Smith, tonyflor, sailordad46, Spirare, BradHartliep, DuncanModerators: Patrick Twohig: 134
Administrators: Scott Carle: 1481
