 Log In
 Register
 Home
Home

 Topic RSS

 Offline


Has anyone replaced their ports with New Found Metals Ports? If so, what measurements did you use? WundorStar is 1978 DE38, and I am going to replace all 6 ports. Need to know the cabin wall thickness, and the size of windows you ordered? Thanks, I searched the forum and did not get any hits th these questions. Travis

Travis and Kim
S/V WundorStar
DE 38 Ketch
 Offline

Hi Travis,
I just replaced the 4 small fixed (leaky) ports on our DE32 with NFM 5" x 12" oval ports. I did have to do some back filling, as the size of the fixed window opening (7" x 14") was a bit bigger than the maximum allowance(6 X 13.5) for the 5x12 ports. I could have gone with bigger square ports….but when I taped up some printed templates they just looked too big and wonky in my opinion. It was an extra few weeks of work to backfill and fair the FG but I'm VERY happy I did – the new smaller ports look gorgeous! Seriously, they're boat jewelry.
The cabin thickness on our DE 32 was 13/16" but after tearing down the headliner we glued up 1/2" Mahogany ply to the cabin sides giving us a new thickness of 1 3/8". The NFM 1.5" standard spigot fit nearly flush with only about a .25" protrusion of the inner flange. Had we not put up 1/2" Mohogany I think we would have achieved a flush installation with the 1.5" spigots and the teak trim rings they sell.
As far as installation goes…I put all four in without the NFM template and counterbore kit. I did use their CAD drawings to print out some paper templates and aligned and taped them up for guides. To cut the holes I used a 3.5" hole saw for the spigot channels, a rotozip for the curved areas and a plunge cut oscillating tool for the straight sections. I waited to crack the first beer until after all the holes were cut. [Image Can Not Be Found] With the holes cut I fit the inner flanges to the cabin sides and clamped them in place and drilled (as straight as possible) through the actual bolt holes – then counterbored with a larger bit from the outside. That's really all there is to it. You may have to do a little grinding with the dremel here and there.
The butyl they provide is good stuff….but it is a MESS to clean up. Use it sparingly on the install and pack in more as needed. I'm still trying to clean up spots where I had too much squeeze out. Acetone and rags seem to do the trick.


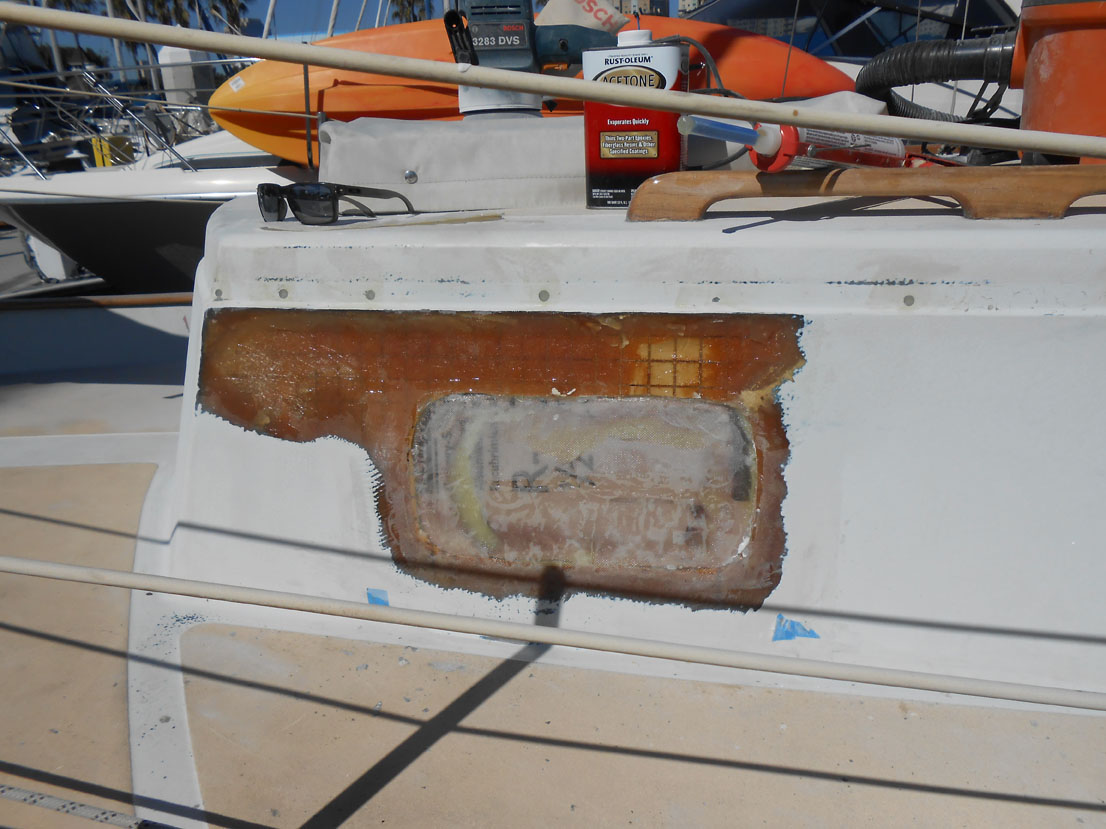
Sidenote: While backfilling the fiberglass I noticed several areas of delamination around the original window cutouts. Upon further inspection I found that there was a void running below and all along the teak cabin top trim, or rather the lip it runs along. It appeared to be from production…as the sharp angle of the trim lip was not adequate for proper adhesion of the FG. I'd wager to say that all DEs have similar issues in that area. It wouldn't be so problematic, had the boatbuilders not affixed the teak trim rail with screws poking all the way through the cabin top…allowing water to weep into the void and elsewhere overtime. Needless to say I filled in as much as I could while installing the new ports.
"The only thing that works on an old sailboat....is the owner!"
 Offline
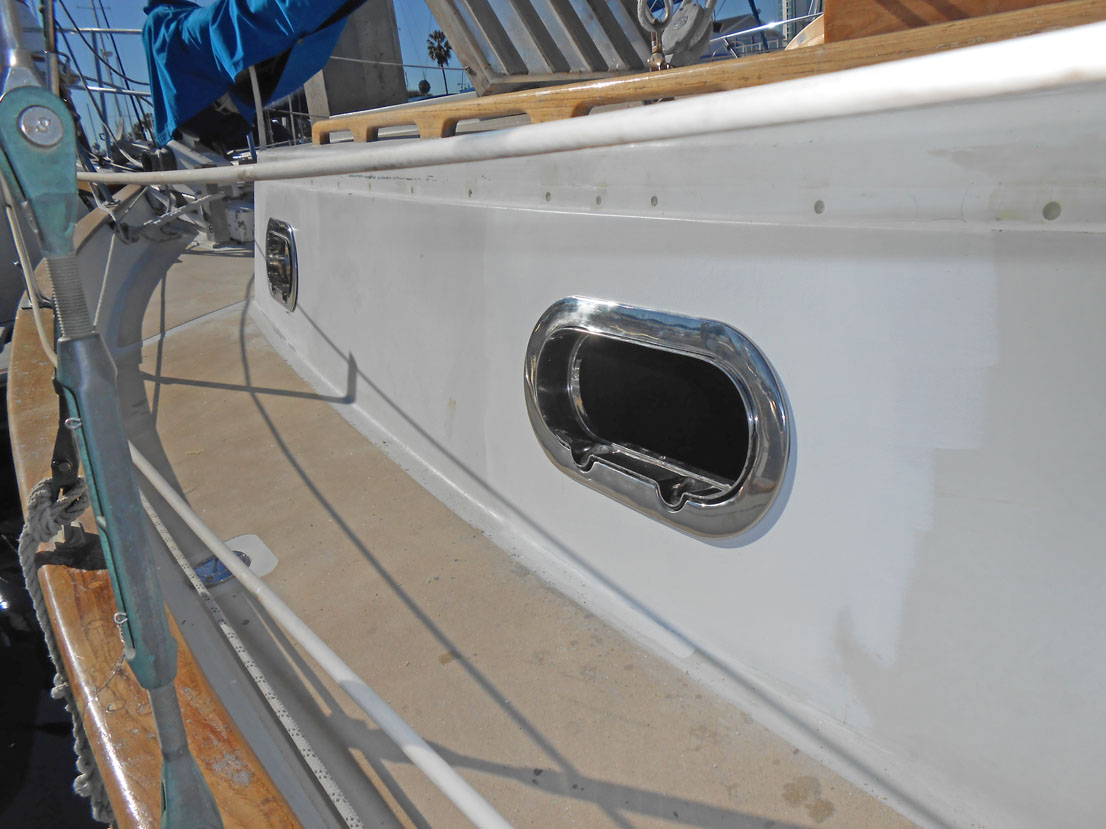
I replaced all six opening ports with NFM stainless steel opening ports. They have been excellent. I believe the 17" ports were very close to a drop in fit. The only extra cutting required was for the 'half-moon' cutouts required for the two drains in each port and the countersinks on the back side of the outside plate. The exact cabin trunk thickness was not required. The outer plate connects to the body of the window using female threaded 'slugs' molded to the plate. You screw the window and outer plate together from the inside. Here is a picture showing how the outer plate sits in a spot where the factory cut the window hole a little too square. (I ended up filling in that gap with thickened epoxy.)
"http://i83.photobucket.com/albums/j315/stanleyea/Argyle/DSCN0548.jpg"
The rest of that folder has a few other other pictures of the install, it should be an open directory.
I used the template from NFM, but it did not line up all the holes perfectly. The moldings from each window differ slightly. If I were doing it again, I would start the drill holes, marking the location of each hole, from the inside using the port itself. I would then use the template to make sure the drill went in at 90 degrees to the surface for each hole. You need to keep each port 'married' to each hole until you complete the install, otherwise the drill holes might not line up. These are well built, but they are not tight tolerance parts.
I used polysulfide to seal up the port against the cabin trunk and 4000UV to seal up the outside plate. If doing it again I would just use the factory butyl. Can't complain though. It's been six years and they haven't leaked a drop. 🙂
 Offline
I put your photos and post up on the main website here and on the front page for s/v Argyle
BlackIrish I will put yours up too if you get me the pictures 🙂
Offline
Cool!!
I posted the link to the photobucket pics so folks could just go and find the rest of the pictures if they were interested. Posting them here is a great idea.
What's going on with the 'corner' pics is that when the original holes were made to the cabin trunk, most of them had rounded corners to match the shape of the portlights. One of the corners on one of the cut holes was cut to a sharp corner instead of being rounded. This made it so you could see the bolt and mating 'slug' in the outer plate through the corner. I wanted to fill that in with thickened epoxy and make the corner rounded. The block of wood on the inside acts as a mold surface for the epoxy.
For some reason I never ended up taking a picture of the cured epoxy, but it did work fine. Like I said, never had any leaks with these ports (touch wood).
Offline
if you want to rewrite what I copied and have me update it with that you can. You can post it here or email it to me.. if you want to that is 🙂
Offline
Thanks everyone for the reply. I am going to order the 6x15, I believe they are the closest to the existing rough cut in. I will try to keep a log when I do it with a photo journal for anyone in the future. But, I think your writing probably covers it.
Travis and Kim
S/V WundorStar
DE 38 Ketch
Offline
Just give me a link to it, email it to me or upload it yourself here. Anything that works for you. That is what makes this site so great is that we can get the experience of hundreds of owners and preserve it for both current and future owners. Since I built the site I have watched at least 25 new owners appear while old owners have moved on after selling their boats. What the old owners contributed has helped the new owners and the new owners have been great in contributing their knowledge forward. I hope that 20 years from now two or three generations of owners along that all this is still there for them. I don't know what I would have done if I didn't have access to all that went before me. I probably wouldn't have purchased valkyr to be honest.. The large knowledge base was a major contributing factor to purchasing her.
Most Users Ever Online: 120
Currently Online:
12 Guest(s)
Currently Browsing this Page:
1 Guest(s)

Top Posters:
Jonathan Oasis: 174
bobmcd625: 165
CAE: 150
mgav451: 143
Rick: 94
svbodhran: 84
Member Stats:
Guest Posters: 7
Members: 364
Moderators: 1
Admins: 1
Forum Stats:
Groups: 3
Forums: 13
Topics: 744
Posts: 3833
Newest Members:
Spirare, BradHartliep, Duncan, MistyDawn, realitysailing, Kwally@sbmnModerators: Patrick Twohig: 134
Administrators: Scott Carle: 1480
